Email to Case is a standard Salesforce feature that allows cases to be created from emails. We will be looking into the detail of On-Demand Email-To-Case and Email Services.
On Demand Email-To-Case
The first question when considering this functionality maybe which email address should be used to send to? We cannot send email to just any email address and have a Salesforce case created. We need to generate it using Salesforce configuration.
Go To Setup > Build > Customize > Email-To-Case > Click on Edit

Email-To-Case settings
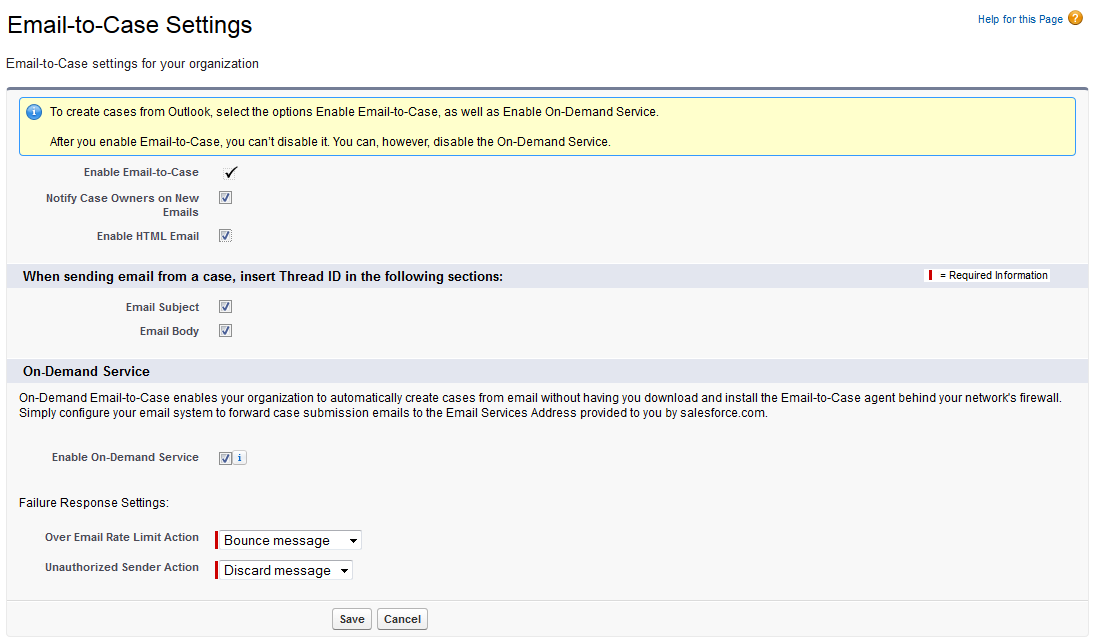
Check ‘Enable Email-to-Case’ to enable this functionality.
Once enabled Email-To-Case cannot be disabled but On Demand Email-To-case can be.
Check ‘Notify Case Owners on New Emails’ to notify case owner of any new case created via Email-To-case.
Check ‘Enable HTML Mail’ to warn users before they view incoming HTML email content so that they can avoid opening potentially malicious content. When not checked users only view the text content of HTML email.
Thread Id settings
When sending email from a case, insert Thread ID in the following sections:
- Email Subject
- Email Body
Ideally check both.
But first what is the Thread Id?
Thread Id is a unique ID generated for each case generated via Email.
If a customer service rep sends an outbound email to a user or replies to a user email (which caused a new case to be created) the thread Id is appended to the Email subject or email body or both. When the email recipient replies back to the email, the email gets associated to the same case record. If the recipient sends a new email after removing the Thread Id, then a new case will be created for every such email. So it’s recommended to insert Thread ID in email subject and email body, both.
Point to note:Ensure that the email body and email subject both are different, otherwise Email-to-Case creates an infinite loop of emails related to each case.
Demand Email-To-Case Settings
Check ‘Enable On-Demand Service’ to enable the service.
- Failure response settings
- Over Email Rate Limit Action
- Unauthorized Sender Action
Select ‘Bounce Message’ if you want email to be sent back to sender
Select ‘Discard Message’ if you want to remove the email message
Select ‘Requeue Message’ if you want to put the email in a queue, so that when the limit gets reset the email can then be processed.
Configure Routing Settings

In Routing addresses section click on ‘New’.
Ensure ‘Email2Case’ is selected in the adjoining picklist.
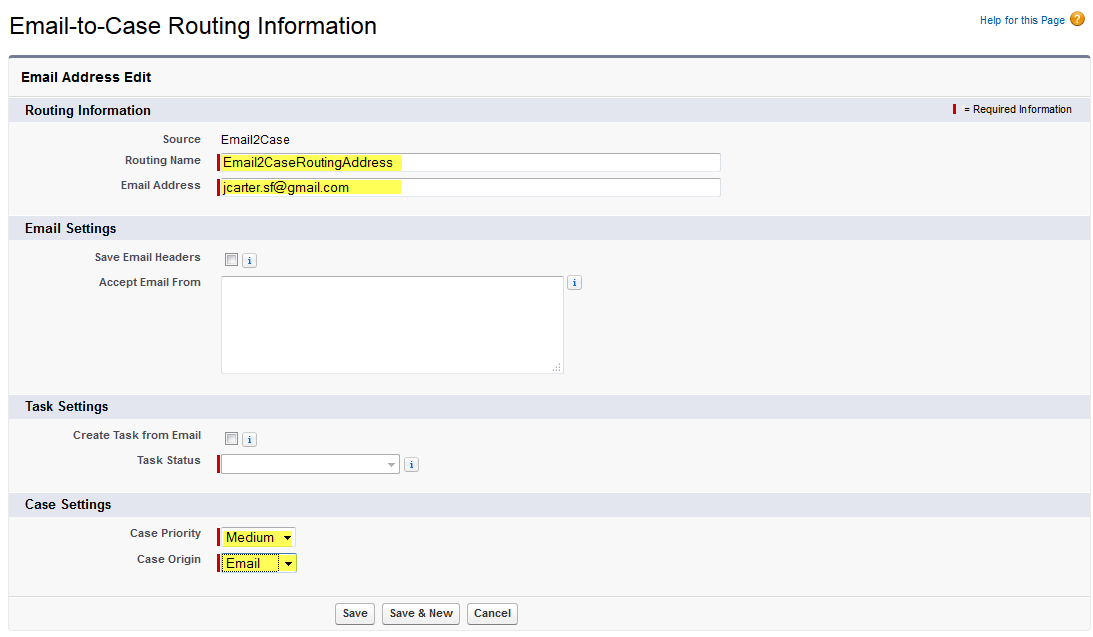
This is where the email address used for creating a case will be generated.
Since the generated address is too long to remember, we need to configure an email routing address, so that the email received to this simple email address will be routed to our generated email address.
Routing Information:
Enter ‘Routing Name’ and ‘Email Address’(The simple email address).
Email settings:
Check ‘Save Email Headers’ if you want to save email routing and email envelope information. May contribute 15KB towards overall organization storage.
Accept Email From :
Enter email addresses or Domains (example.com, this.com, that.com) to ensure that email sent from these senders will only create case.
Task Settings:
Deals with ability to create a task when email is received from the desired recipient.
Check ‘Create Task from Email’ to yes you guessed right. The created task will be a child to the created case.
Select the default task status.
Case Settings :
Select the default case priority and case origin. We select as ‘Medium’ and ‘Email’ respectively.
After this you will witness that a new ‘Email Service Address’ is generated.
Before getting started you need to verify your routing email address and setup routing in your email settings
- Verify Email Address
- Click on verify
- Salesforce send a verification email to your routing email address with verification link
- Click on the link
- You are verified
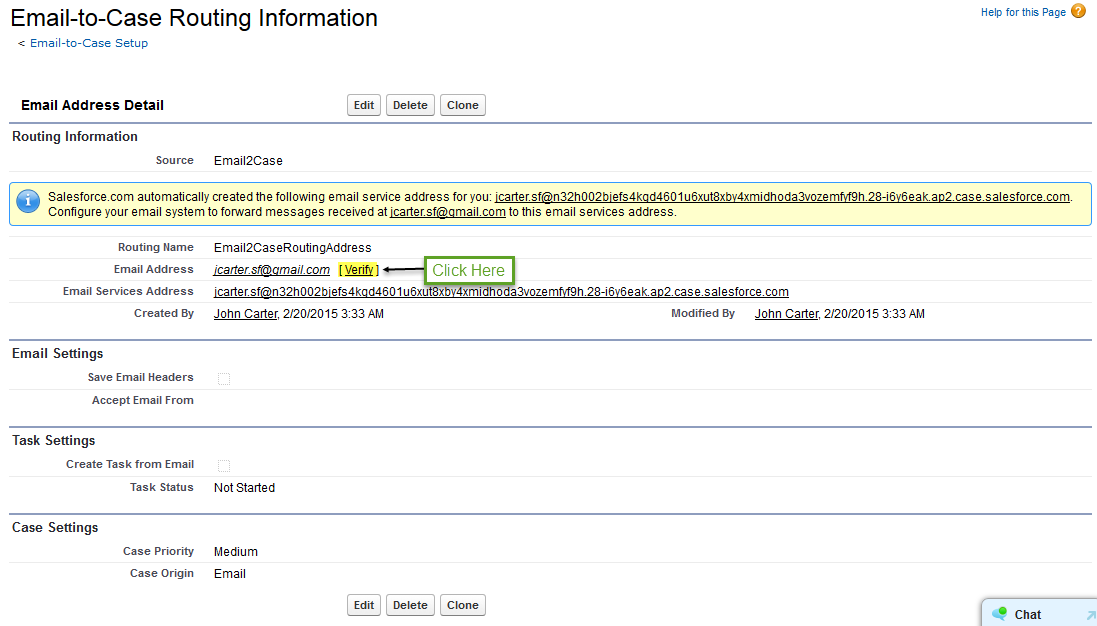
After Clicking on verify.


Setting Up Routing/Forwarding Rules
I have used my Gmail Id for setting up routing.
We configure such that emails received to jcarter.sf@gmail is sent to jcarter.sf@n32h002bjefs4kgd4601u6xut8xby4xmidhoda3vozemfyf9h.28-i6y6eak.ap2.case.salesforce.com
Since it being a non Salesforce topic here is a very good link to the steps how to configure including step by step screenshots.
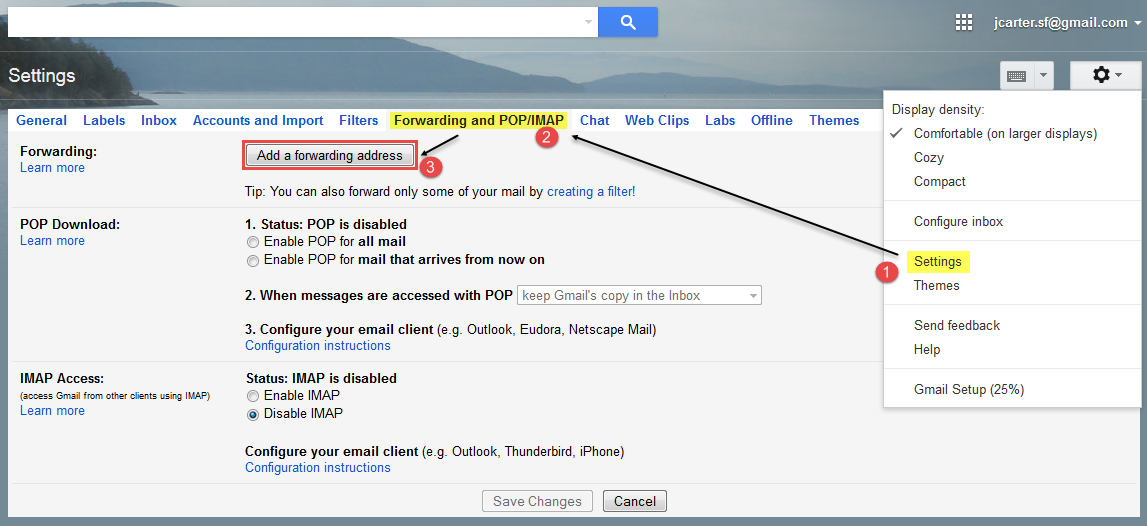
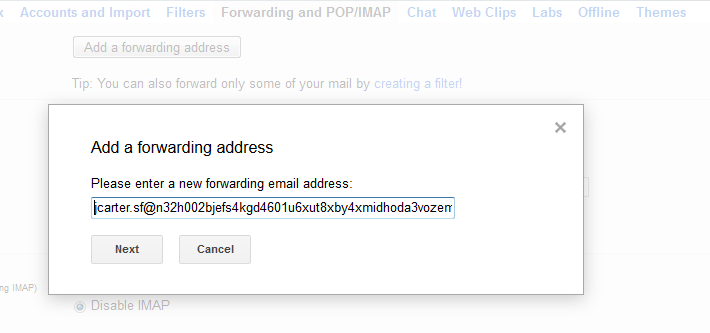
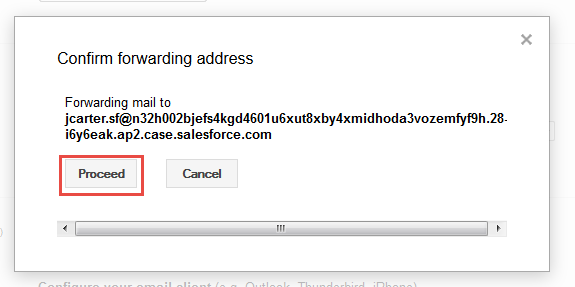
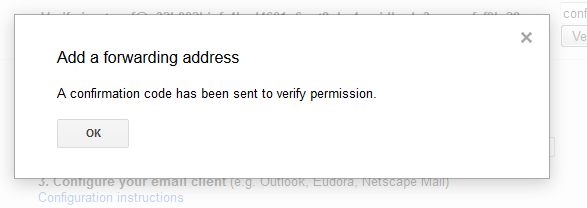
When a verification code is sent to jcarter.sf@n32h002bjefs4kgd4601u6xut8xby4xmidhoda3vozemfyf9h.28-i6y6eak.ap2.case.salesforce.com you may notice that a new case is created. This is a first line of proof that we our Email-To-Case is working as expected.

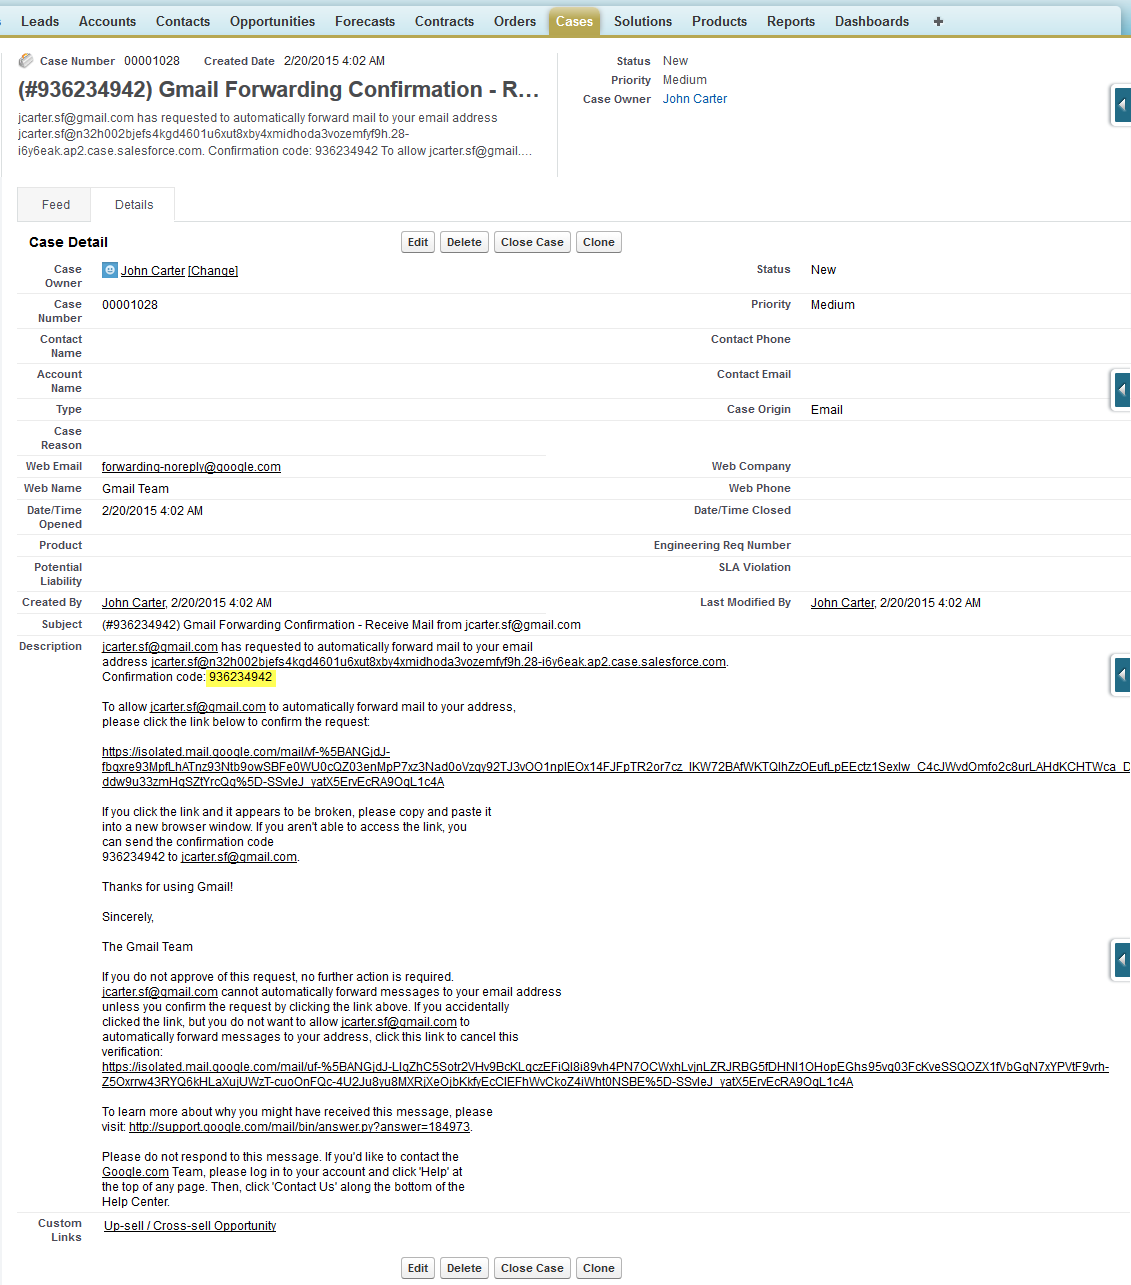
Email to case gmail forwarding example
Now Is The Time To Put Our Efforts To Test
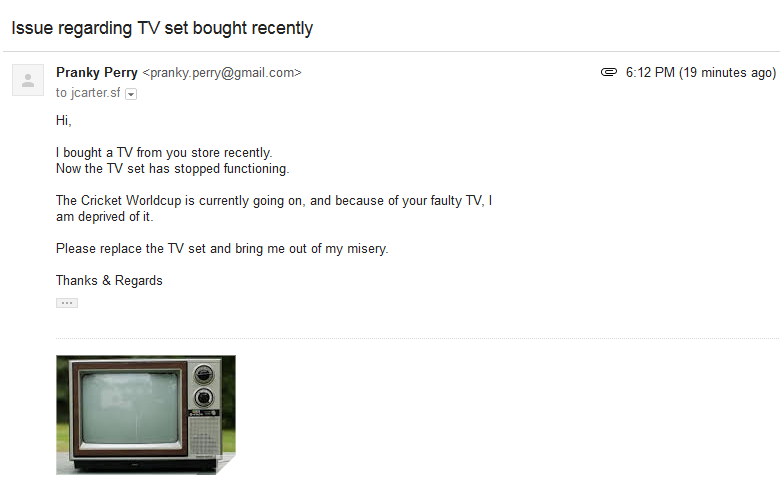
Pranky Perry is your customer she wants to complain about the defective Television she purchased form you and wants you to do something about it. Since she is a customer, our organization needs to have a contact record for her.
Make sure that email address is populated properly. Because Email-To-Case searches for a contact based on the email Id and creates a case for that contact.
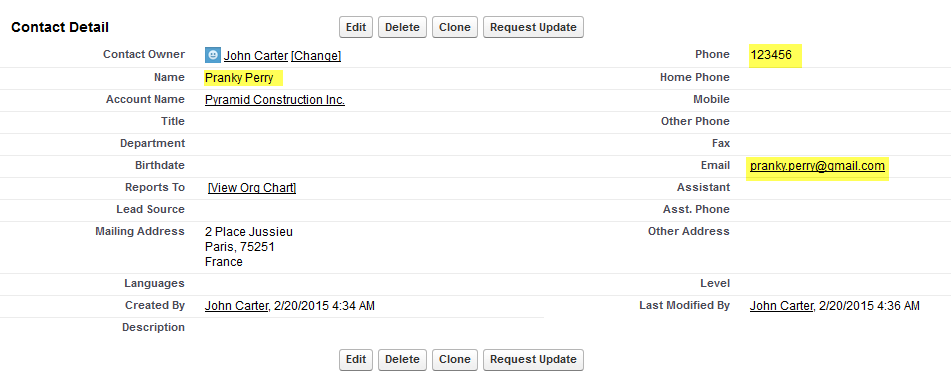
Pranky Perry sent you a mail:
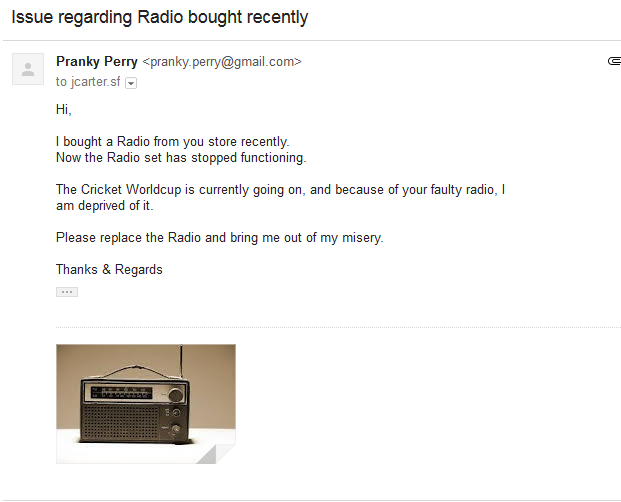
And viola a case is created!!!

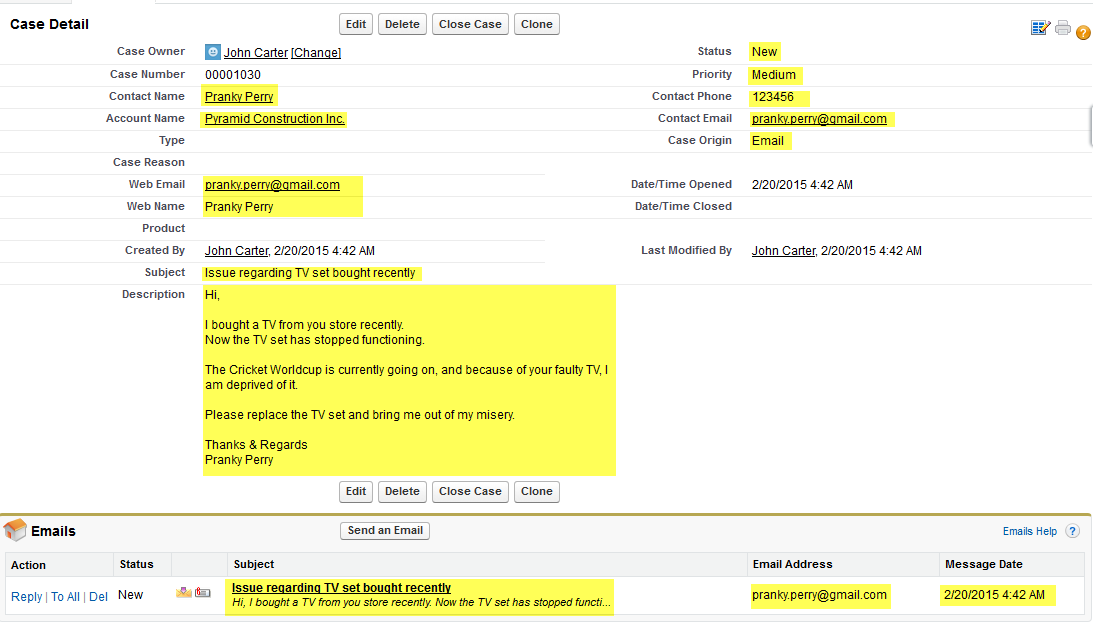
Time to rejoice.
Observe that case gets properly associated to proper contact (Pranky Perry) and all the contact fields are properly populated.
Email Subject is properly populated in Case Subject.
Email Body gets populated in Case Description.
Email record is properly associated to the created case.
Now time to try some variations.
I am quite sure, the idea would have crossed your ever inquisitive mind as to what happens when no contact is present for the email sender.
Let’s analyze this.
For the Pranky Perry contact change its email address.
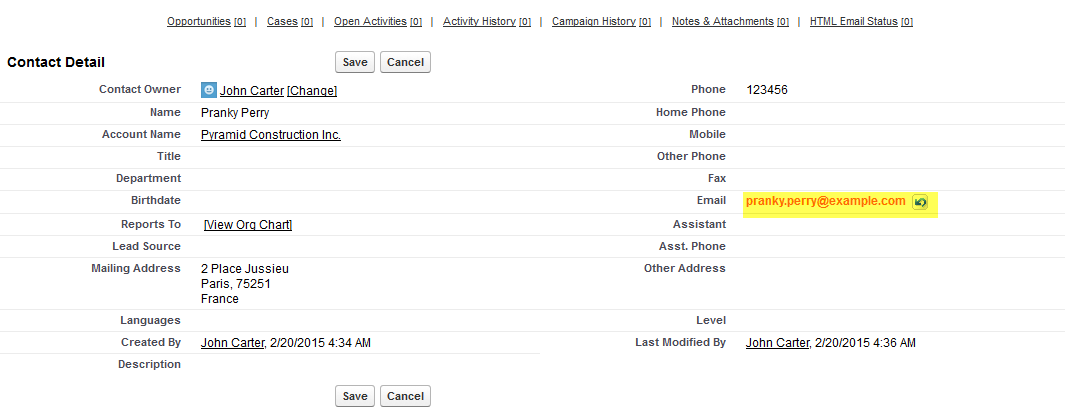
Pranky Perry sends a new complaint email. (Mind you your company’s reputation is at stake).
Viola a new case is still created.

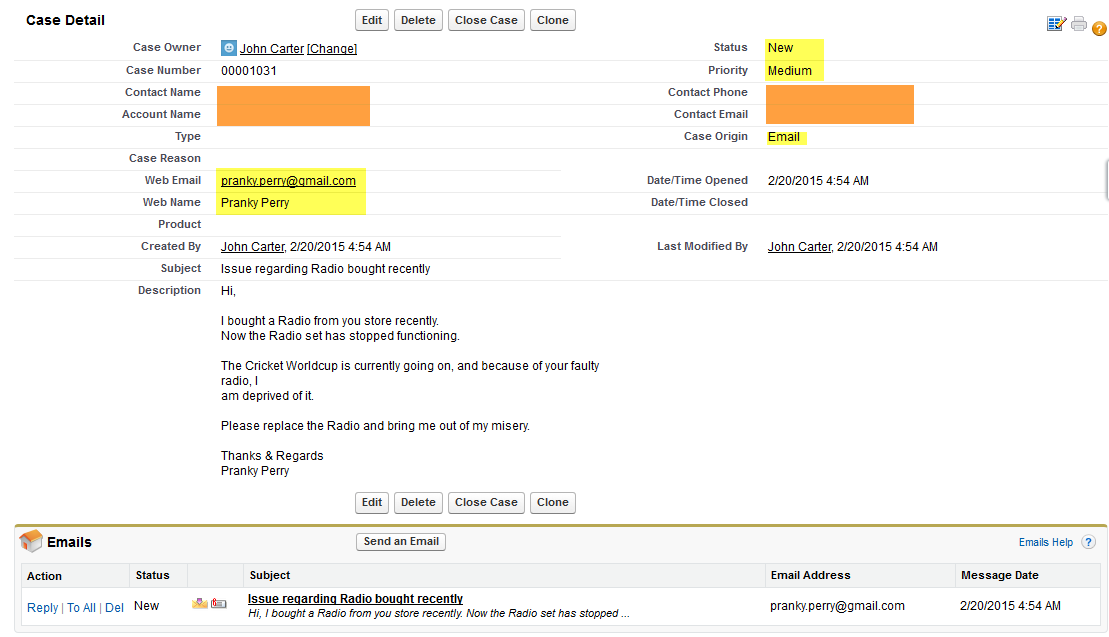
But wait; the new case has no contact associated with it. But the from email address has been populated in ‘Web Email’ field and sender’s name is populated in ‘Web Name’.
So you see a new case is still created.
Email Service
Email Service provides you with a greater power. It generates an email address much like On Demand Email-To-Case. But it also has an Apex class associated with it. This class has the power to fetch the received email and its content, work with it and create the required records. For example it can create a case using the email, create a task or create an attachment (Text Or Binary) .
Let’s us work with an example scenario.
When an email is received we will check whether a contact with same ‘From Address’ is present or not. If present a case will be created for the contact. If not present the a new contact will be created and a new case will be created for the new contact. Let us create one such apex class:

Email to case code example
The class is self-explanatory with appropriate comments:
After that we need to configure the email service.
Go to Setup > Build > Develop > Email Services > Click on new email service.
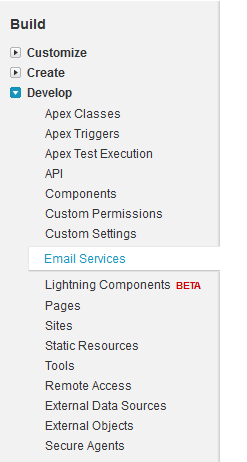
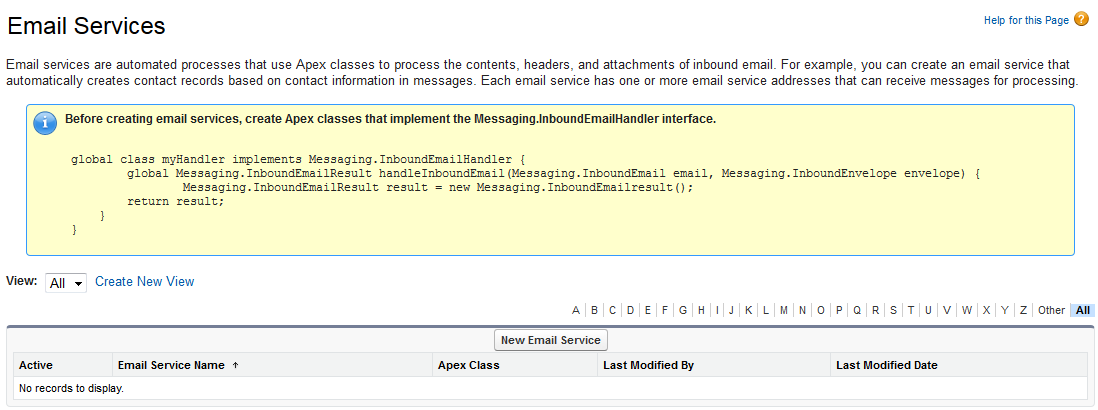
Click on ‘New Email Service’
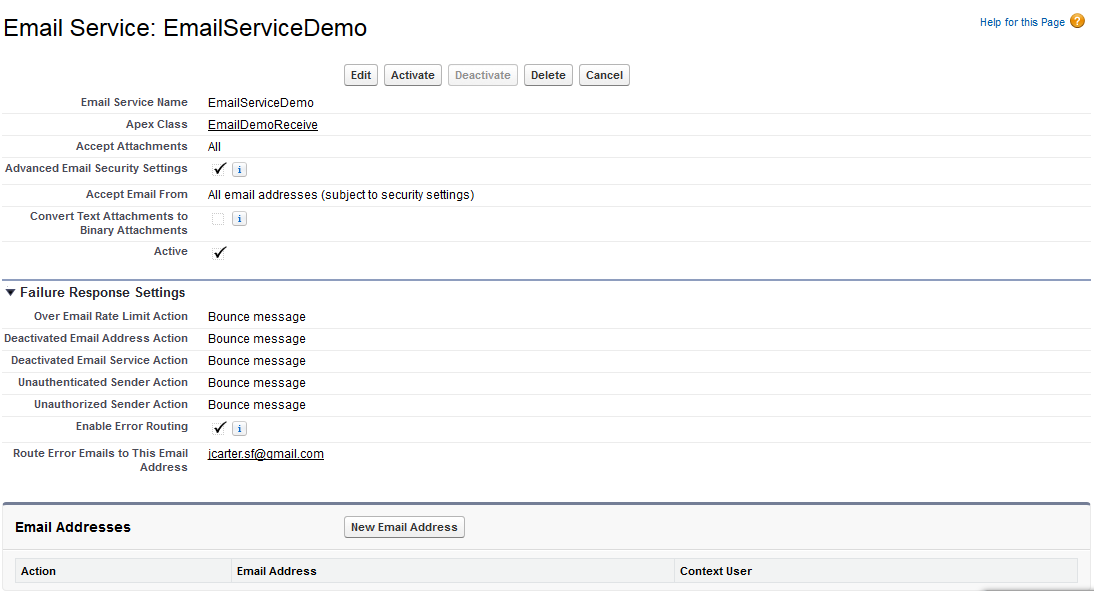
Settings
Enter Service Name.
Select the Apex class just created.
Accept Attachments: Selecting ‘Text’ will enable only text attachments to be accepted. Selecting ‘Binary’ will enable attachments like image, excel files, video or audio to be accepted. We select ‘All’.
Checking ‘Advanced Email Security Settings’ will enable advanced security settings.
Enter the email addresses or domains from which you intend to receive emails. Blank means all emails will be accepted.
Checking ‘Convert Text Attachments to Binary Attachments’ will do so.
Check ‘Active’ to activate the email service.
Failure Response Settings
Select the appropriate failure response settings.
Click on ‘ New Email Address’ button.

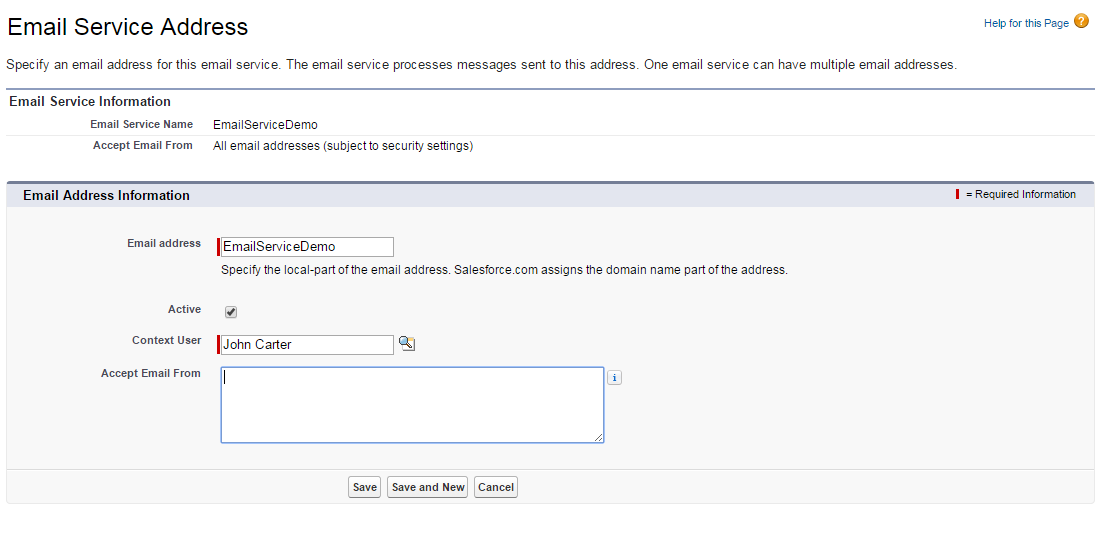
In ‘Email Address’ field enter the local part of the email address.
Check ‘Active’ to activate the email address.
Select ‘Context User’. This user will be running the apex class.
Enter the intended sender email addresses or domains in ‘Accept Emails From’.
Click on Save.
An email service address will be generated.

You can configure the routing for this email address, just the same way as you did with On Demand Email-To-Case.
For now we will directly utilize the email service address.
Time To Check The Functionality.
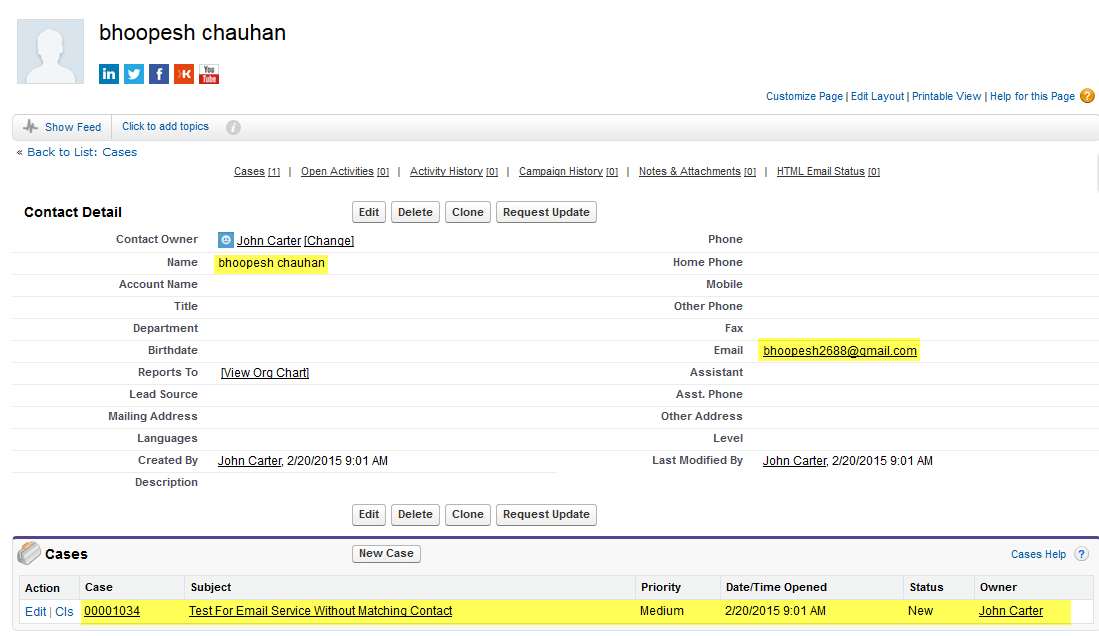
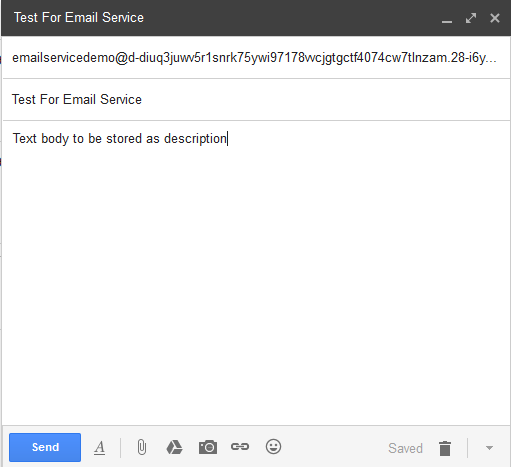
Scenario : Bhoopesh Chauhan, your customer sends an email to this email service address.
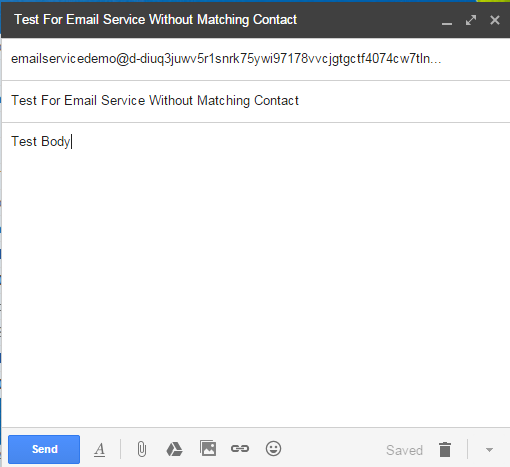
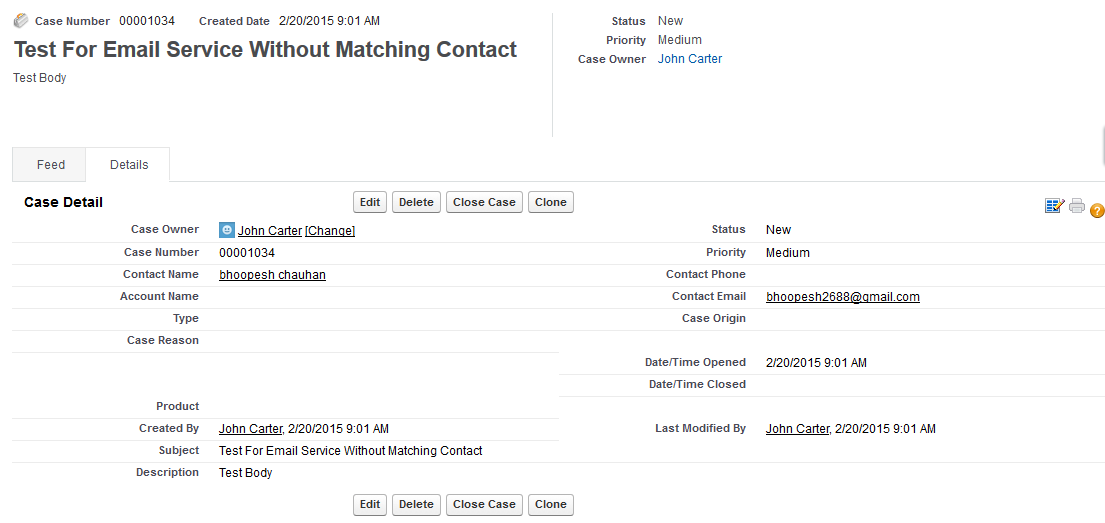
Since no contact is present a new contact is created and new case is created for this contact. Email subject is populated in case subject and email body is populated in case description.
New case created:

New Contact Created:
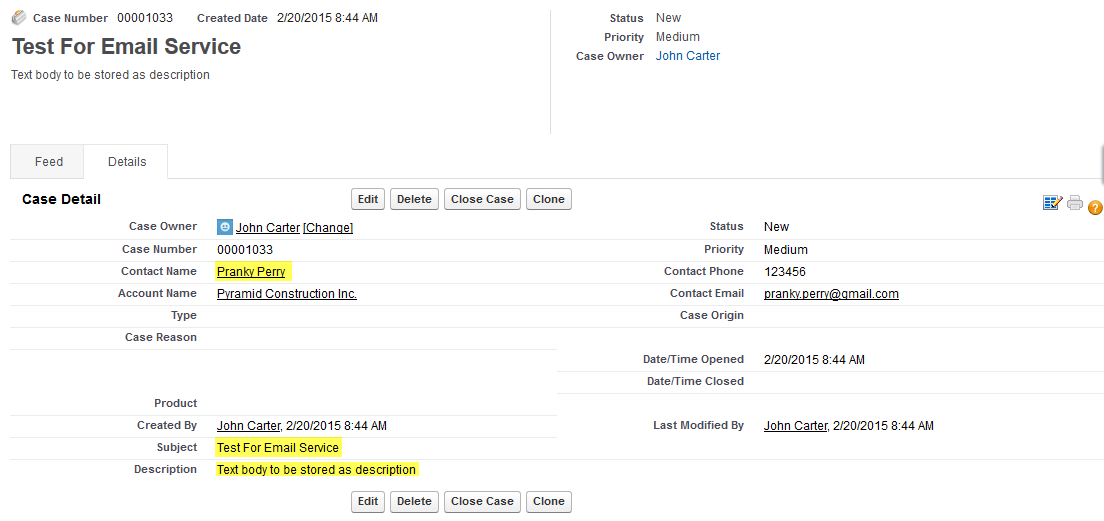
There is a contact for Pranky Perry. So if Pranky Perry sends an email to this email service address a case is created for the proper contact.
Created Case :
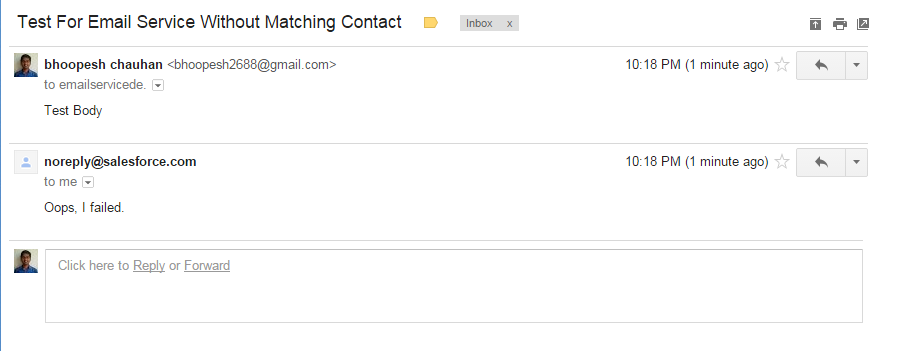
In case of any exceptions the following mail is sent to the sender; as required
Limitations :
- Generic cases are created for On Demand Email-To-Case.
- Different Types of emails will create same type of case with the same record type for On Demand Email-To-Case.
- Email Service on the other hand requires apex coding knowledge.
- If the user email is not as expected, then even email service may find it difficult to create a meaningful case.
- There is a risk of spam cases being created for gibberish emails.
- On-Demand Email-to-Case: Maximum Email Attachment Size is 10 MB
- On-Demand Email-to-Case & Email Services: Maximum Number of Email Messages Processed is :
- Number of user licenses multiplied by 1,000, up to a daily maximum of 1,000,000
- For Email Services maximum size of email can be 25MB (Body and Attachment)
A brief Note about Email-To-Case |
Email-To-Case requires to install an agent behind the firewall. Download the agent from -http:// wiki.apexdevnet.com /index.php / Members : Email_To_Case |
Then configure the routing address. All email traffic is kept within your network’s firewall and accepts emails larger than 25 MB. Considering its less prevalence we will be focusing on On Demand Email-To-case. Unlike Email-to-Case, On-Demand Email-to-Case uses Apex email services to convert email to cases, without requiring you to download and install an agent behind your network's firewall |
What Certification are you studying for now?
Focus on Force currently provides practice exams and study guides for sixteen certifications


Hello,
Not sure if this is a recent update, but the Maximum Email Attachment Size is now 25 MB for On-Demand Email-to-Case. Source: https://help.salesforce.com/articleView?id=faq_cases_what_is_the_largest.htm&type=5