List buttons can be used on list pages, search results and any related list for an object. They allow us to take actions on a group of selected records. In this article we are going to show some examples of how Javascript can be used to work with one or more records in a list view or related list. These are examples for Salesforce Classic, if you want to know about updates to Javascript Buttons in Lightning Experience, check out this article.
Use case: We need to automate the following actions.
- Quick Create a contact (allow user to enter contact’s name and use the phone number from it's parent account).
- Activate a set of selected contacts. The Status field should be set to “Active” and Last Contacted field should be set to today’s date.
- Quick Delete a set of selected contacts. User should confirm changes.
The Contact object has the following custom fields: Status (which indicates if the contact is active or not) and Last Contacted (indicates when the contact was last contacted).
Quick Create
To get started, we need to understand the tools we will be using. We are not using APEX in this example, only Javascript. To allow us to work with the Salesforce database through Javsascript, we need to use the AJAX Developer Toolkit which is a wrapper around the Salesforce API.
So, let’s create the first button which creates a contact record.
Go to Setup – Customize – Contacts – Buttons, Links, and Actions and hit the “New Button or Link” button:
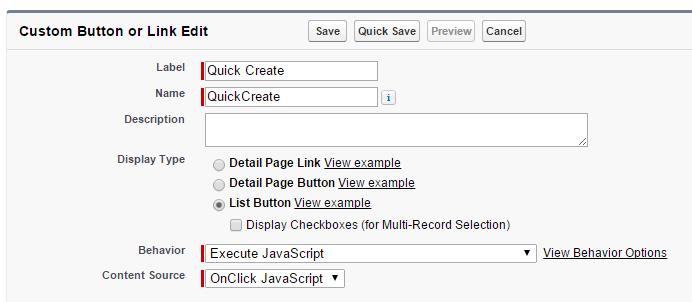
Select “List Button” display type, “Execute JavaScript” behavior and “OnClick JavaScript” content source. It will execute our JS code on click.
Now, we have to connect the Ajax Toolkit. We use the REQUIRESCRIPT function. The Library is connected by following syntax:
{!REQUIRESCRIPT('/soap/ajax/35.0/connection.js')}
More about Ajax Toolkit features can be found in the AJAX Toolkit Developer's Guide
Now we have to create a contact record. This action has the following syntax:
var contact = new sforce.SObject("Contact");
After that we can work with contact variable’s fields as we do with SObject fields in Apex. So, we should assign values to fields:
var name = "";

while (name === "") {
name = prompt("Enter Name");
}

contact.LastName = name;
contact.AccountId = "{!Account.Id}";
contact.Phone = "{!Account.Phone}";
contact.Status__c = "Inactive";
You can see Contact’s Name field is assigned from the Javascript prompt. To save this record we call the sforce.connection.create() method:
var saveResult = sforce.connection.create([contact]);
The saveResult variable contains information about the result of the call to the sforce.connection.create() method. If the record creation is successful, it will contain the saved record ID and a “success” : “true” flag. Otherwise it will contain an error message.
Then we just check the action state and reload the page if it is successful or show the error otherwise:
{!REQUIRESCRIPT('/soap/ajax/35.0/connection.js')}

var contact = new sforce.SObject("Contact");
var name = "";

while (name === "") {
name = prompt("Enter Name");
}

contact.LastName = name;
contact.AccountId = "{!Account.Id}";
contact.Phone = "{!Account.Phone}";
contact.Status__c = "Inactive";

varsaveResult = sforce.connection.create([contact]);
varisSuccess = saveResult[0].getBoolean("success");

if (!isSuccess) {
alert(saveResult[0].get("errors").get("message"));
}

location.reload(true);
Let’s check our button! Go to Setup – Customize – Accounts – Page Layouts and select the layout you need to customize. In Page Layout Editor hit on the Contacts Related List Properties sign and go to the Buttons section:
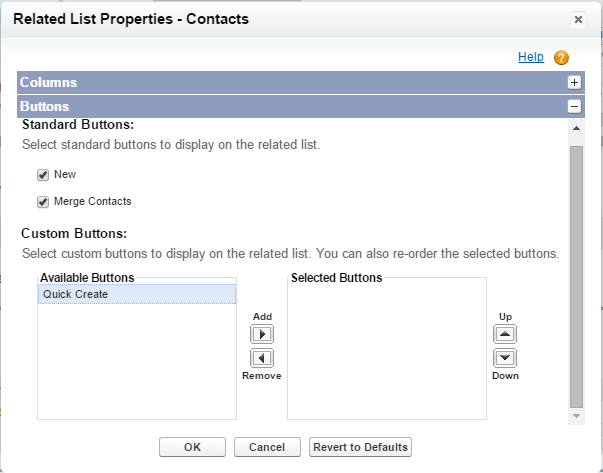
Let’s add the button and click OK. Then just save Account’s layout.
Now, let’s go to any account record and make sure that our button is displayed on the related list:

Hit the Quick Create button. The dialog box appears to enter a name:
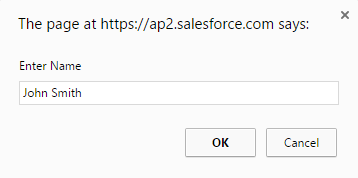
Enter the name for new contact record. For example, John Smith and hit OK button. The page will be reloaded and a new contact record will appear in the related list:

Update Multiple Records
Now let’s create another list button to update multiple records for our Activate use case.
Go to Setup – Customize – Contacts – Buttons, Links, and Actions and hit the “New Button or Link” button:
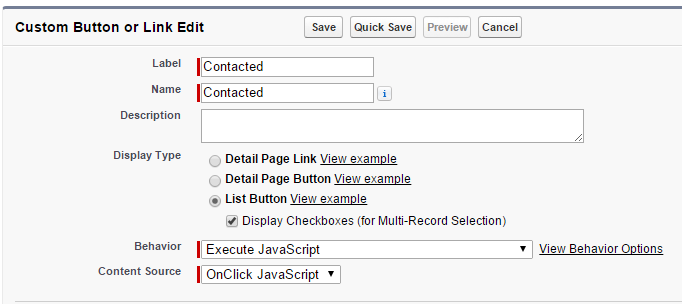
As you can see, almost all preferences are the same as in Quick Create button. The difference is in “Display Checkboxes” checkbox. This preference allows us to select multiple records in the related list.
The Javascript code is similar to Quick Create but we need to get the selected records by using the following function:
varselectedContactIds = {!GETRECORDIDS($ObjectType.Contact)};
The GETRECORDIDS function retrieves the selected contact Ids and stores them in the selectedContactIds variable. But they are just Ids, not the records!
We need to declare an array to collect the contact records that should be updated. Then we iterate through all the selected records and create a new instance of contact. We then assign the Id value of the existing record to the new record and in the update call Salesforce will update the fields in the record for the matching record Ids.
Then we have to set the Status and Last Contacted fields to new values and push the record to the array. Notice how to assign the Date field – we use Date().toISOString() function to ensure that Last Contacted field will get correct value. Otherwise we will get an error message about incompatible types.
To update the records, we call the update action and refresh the page:
varsaveResult = sforce.connection.update(contactsForUpdate);
location.reload(true);
The full code:
{!REQUIRESCRIPT(‘/soap/ajax/35.0/connection.js’)}

varselectedContactIds = {!GETRECORDIDS($ObjectType.Contact)};
varcontactsForUpdate = [];

if (selectedContactIds[0] == null) {
alert(“You must select at least one record”);
} else {
for (vari = 0; i < selectedContactIds.length; i++) {
var contact = new sforce.SObject(“Contact”);
contact.Id = selectedContactIds[i];
contact.Status__c = “Active”;
contact.LastContacted__c = new Date().toISOString();
contactsForUpdate.push(contact);
}
}

varsaveResult = sforce.connection.update(contactsForUpdate);
location.reload(true);
As with the Quick Create button we need to add the button to the page layout.
Go to Setup – Customize – Accounts – Page Layouts and select the layout you need to customize. In the Page Layout Editor Contacts Related List Properties go to the Buttons section:
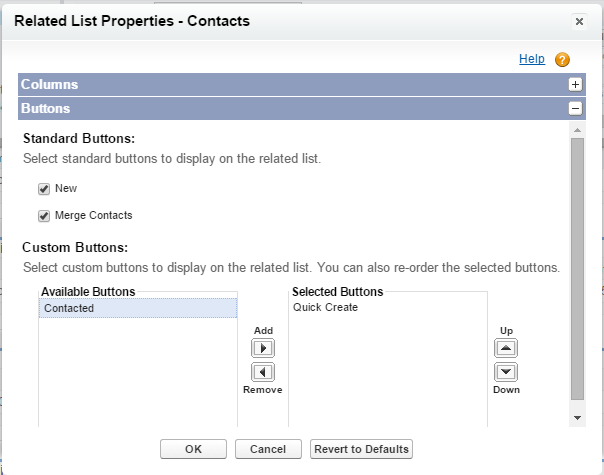
Add the button and click OK. Then just save Account’s layout.
Go to any Account record and make sure that the new button is displayed:

Let’s select our John Smith contact and hit the Contacted button. The page should be refreshed and the John Smith record should be updated:

Delete Records
Finally, lets add a button to delete selected records. Go to Setup – Customize – Contacts – Buttons, Links, and Actions and click the “New Button or Link” button:
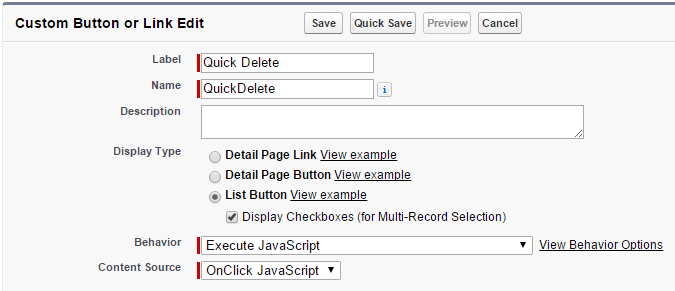
The code is similar to the previous examples. Below you can see the full code listing:
{!REQUIRESCRIPT('/soap/ajax/35.0/connection.js')}

varselectedContactIds = {!GETRECORDIDS($ObjectType.Contact)};

if (selectedContactIds[0] == null) {
alert("You must select at least one record");
}
else {
if (confirm("Are you sure?")) {
varsaveResult = sforce.connection.deleteIds(selectedContactIds);
location.reload(true);
}
}
As you can see, getting the contact Ids and using an alert if no records are selected are done the same way as the update call. The sforce.connection.deleteIds()method receives just a set of record ids and performs delete call to Salesforce database.
Let’s add the button to related list. Go to Setup – Customize – Accounts – Page Layouts and select the layout you need to customize. In Page Layout Editor click the Contacts Related List Properties and go to the Buttons section.
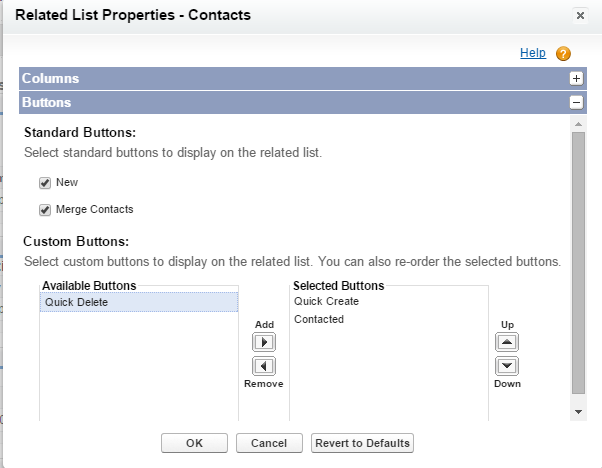
Add the button and click OK. Then just save Account’s layout.

Let’s try and delete the John Smith’s contact record. After clicking the Quick Delete button, the confirmation dialog appears:
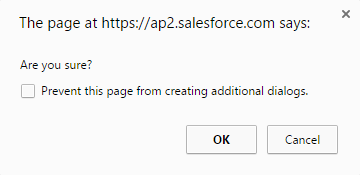
Now, check that John Smith’s contact does not exist anymore!

What are the advantages of using this approach?
- We can perform database calls without using Apex.
- We avoid creating a custom interface.
- We can use these buttons on a standard list view.
What Certification are you studying for now?
Focus on Force currently provides practice exams and study guides for sixteen certifications

