You may find yourself with the requirement to create a record from a related list and populate a number of fields. By default, Salesforce will populate the field on the related record that links the two objects, but no other fields. For example, if you create a record for a custom object related to an opportunity, the custom record will have the opportunity populated as it relates the two records, but it is not possible to pass the opportunity account to the custom object.
There are two ways around this, the first way is to use code and the second is to construct a URL ‘hack’. A URL ‘hack’ is taking the standard URL that Salesforce constructs when it creates a new record and enhance it with additional parameters to populate the required fields. Here are the steps to construct a URL hack and use it by overriding a new button to create a new record and populate a number of fields.
- Obtain the standard Salesforce URL that Salesforce constructs when creating a new record
- Determine the names and ids of the fields that you would like to populate
- Add in the TARGETFIELD=VALUE pairs for the additional fields to be populated into the URL string
- Create a custom button on the child object with the custom URL string
- Edit the page layout on the master object to remove the standard New button and replace it with the custom button
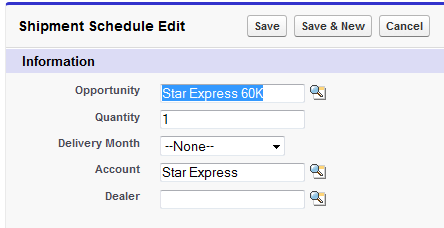
To demonstrate these steps, we will use the example of needing the populate a number of fields in a custom object ‘Shipment Schedule’ that is linked to the standard Opportunity object.
![]()
![]()
Step 1 is to find the URL that Salesforce generates when a new record is created.
When the standard New button is clicked, Salesforce generates a URL like this:
https://ap1.salesforce.com/a0O/e?CF00N9000000716bY=Star+Express+60K&CF00N9000000716bY_lkid=0069000000CWZDg&retURL=%2F0069000000CWZDg
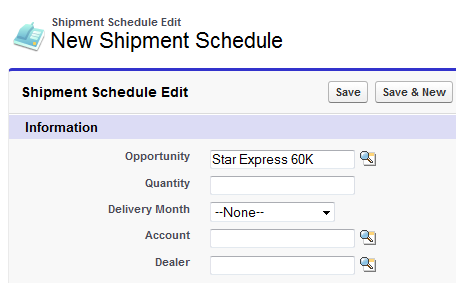
The custom object has the Opportunity field from the Opportunty populated, but no other fields:
Opportunity Fields
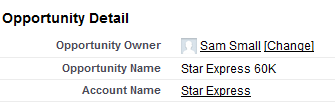
Shipment Schedule Record
Lets say the requirement is to populate the Account from the Opportunity and also to prepopulate the Quantity to 1.
Step 2 is to find the name or id of the fields that will be populated. We need the name or id of the source field and the target field.
In our case, the source field for Account is
{!Opportunity.Account} (using the syntax of a merge field in an email template)
The target field is the custom field that will be populated. In our case it is the Account Name on the Shipment Schedule custom object and we need the id of this field.

To get the id, we need to click on the field label to be taken to the custom field detail screen.
The Id is part of the URL string generated for this screen, in this example:
https://ap1.salesforce.com/00N900000071Cv4?setupid=CustomObjects
and for Quantity:
https://ap1.salesforce.com/00N9000000716j3?setupid=CustomObjects
Step 3 is to add in the TARGETFIELD=VALUE pairs for the additional fields to be populated into the URL string
We can now make our TARGETFIELD=VALUE pairs.
There is one other consideration. As Account on the Shipment Schedule is a lookup to account, as well as populating the Account Name on the Shipment Schedule custom object, we need to populate the record id. So the TARGETFIELD=VALUE pair for account will be:
CF00N900000071Cv4={!Opportunity.Account} (for Account Name)
CF00N900000071Cv4_lkid={!Opportunity.AccountId} (for Account Id)
CF is used as a prefix to identify custom fields, and _lkid as a postfix to identify the target lookup id field.
For Quantity, the TARGETFIELD=VALUE pair will be:
00N9000000716j3=1 (we are setting the Quantity Value to 1)
So now, we can add the TARGETFIELD=VALUE pairs into the original URL string.
Note also:
- We have removed the instance name so it is now a relative URL
- We have replaced the record id of the opportunity in the return URL parameter with the Opportunity Id
- We need to use CF as a prefix to the ids on the custom fields
- We have replaced the hardcoded opportunity name with {!Opportunity.Name} and {!Opportunity.Id} to pass the Opportunity values
- We have added a save URL parameter to ensure after the record is saved the user is navigated back to the opportunity
/a0O/e?CF00N9000000716bY={!Opportunity.Name}&CF00N9000000716bY_lkid={!Opportunity.Id}&CF00N900000071Cv4={!Opportunity.Account}&CF00N900000071Cv4_lkid={!Opportunity.AccountId}&00N9000000716j3=1&retURL=/{!Opportunity.Id}&saveURL=/{!Opportunity.Id}
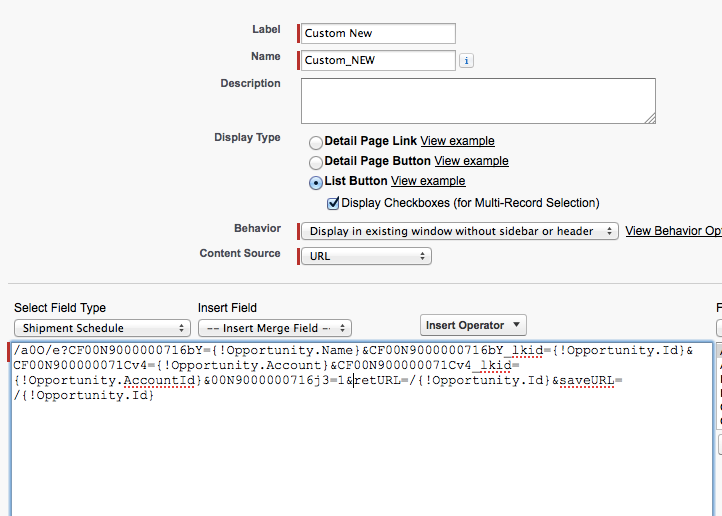
Step 4: Create a custom button on the child object with the custom URL string
Next we create a custom button on the Shipment Schedule custom object and use our URL:
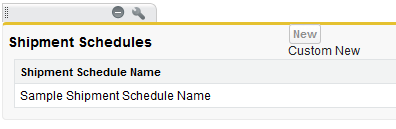
Step 5: Edit the page layout on the master object to remove the standard New button and replace it with the custom button
Next we replace the standard New buton with our Custom Button.
Now when we create a record using our custom new button, the fields on the Shipment Schedule will populate:
What Certification are you studying for now?
Focus on Force currently provides practice exams and study guides for sixteen certifications

how do you do this in Lightning?
Hi Tim, Salesforce URL hacks were not possible in Lightning Experience due to custom button limitations. Object Actions were the closest option to it in Lightning. However, in the Spring 20 release, it looks like Salesforce has acknowledged and supports its use case: https://releasenotes.docs.salesforce.com/en-us/spring20/release-notes/rn_general_lex_navigate_to_record_dfv.htm