Conga Composer is one of the most widely used 3rd party AppExchange apps for document generation with Salesforce. It can be used to merge Salesforce data to produce documents in Word, Excel, Powerpoint, HTML Email and PDF format. Here is a quick guide to generating an Excel spreadsheet with data from Salesforce.
- Create Your Excel Template
- Define the Fields and Reports it will use
- Add Merge Fields to the Excel Template
- Create a Salesforce Conga Template Record
- Setup Your Conga Button
1. Create Your Excel Template
The first step is to define the Excel template. Create labels and leave room for the field values. If there will be any tables of data think about how many rows you need, so you can define the layout around that. For example you may want a list of open opportunities sorted by amount value. Perhaps you only want the top 5 for a particular account. In that case you can design your template around a table with 5 rows.
2. Define the Fields and Reports it will use
List the fields that will be used on the report. If you are having any tables of data, define or create the reports that will supply the data. Make sure the fields you need are in the reports. If the Excel table will only have a limited number of rows, use the row limit feature in Salesforce reports to make sure that the report will only return a certain number of rows.
3. Add the Merge Fields to the Excel Template
Add the fields from the master object and any report fields to the template. For the master fields, use the syntax : &=Master.FIELD_NAME

Conga Excel Merge Fields
For reports, you can reference the report by an alias that you define in the conga button, and then reference the field names. In this case, the opportunity report alias is OPPS.
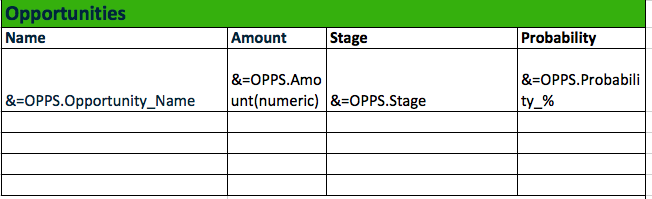
Conga Excel Table Report Merge Fields
4. Create a Salesforce Conga Template Record
In this step, you create the conga template record that is referenced by the Conga Button. You create a Conga Template record and attach the actual template as an attachment to the record. You then grab the id of the record and use that in your Conga button definition. Remember to update the id when deploying into a new environment as it will be different.
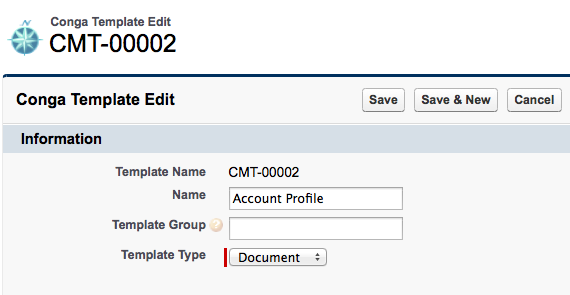
Conga Account Profile Template Record
5. Setup Your Conga Button
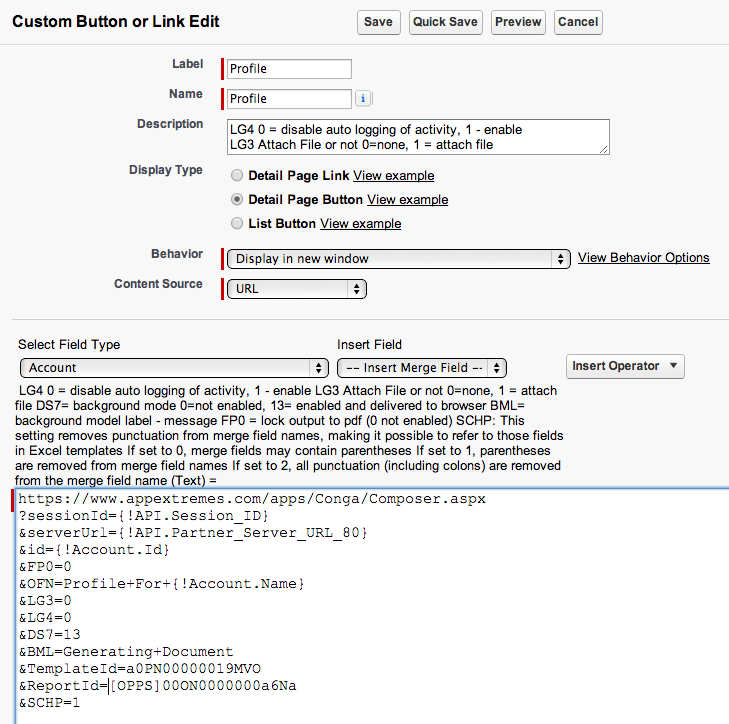
Conga Button Setup
The basic setup of the button to work with Excel is no different to setting it up to work with Word.
After the Conga URL, in this case the button is on Account so we provide the Account Id and then use the various Conga parameters to control the behaviour of the document generation. In the example we are using the following parameters:
FP0: Controls whether to lock the output as PDF. In our case, we are not.
OFN: Used to generate the file name of the produced document. In this case it will be ‘Profile For ‘ and then the Account Name.
LG3: Used to control if a generated document is attached to the account record. We are using 0 for no attachment. This is very useful to have a log of the documents generated over time, especially if being used for quotes or order documents.
LG4: Used to control if an activity is logged against the account record. We are using 0 for not logging an activity.
DS7: Used to control background mode. When the document is being developed this is usually set to 0, but once you are complete it is set to 13 so that the document is generated automatically and delivered to the browser.
BML: Message displayed when the document is being generated.
Template Id: This is the Id of the Conga Template record you created and attached the template file.
Report Id: If a report is being used as a data source for the template, the Id is specified here. In this case, we are using an alias for the report [OPPS] to make it easier to refer to it in the report.
SCHP: This removes punctuation characters from Salesforce field names, as they can cause problems in Excel.
What Certification are you studying for now?
Focus on Force currently provides practice exams and study guides for sixteen certifications