
As Salesforce projects and deployments get more complex, it is a good idea to learn more about the different deployment options that Salesforce provides. When starting with Salesforce, you learn about how change sets can be used to deploy changes between related orgs. Change sets are only one of the many ways available by which you can deploy one Salesforce Org’s components to other.
For example:
- Change sets
- Eclipse IDE
- ANT
- Custom Tool (you can create your own custom utility to deploy/retrieve metadata using the metadata API)
Let’s understand a little more about each of them:
- Change sets: Change sets are primarily available only in Production and Sandbox instances, you cannot use Change sets to deploy/retrieve metadata to other unrelated Salesforce Orgs.
- Eclipse IDE: By using Eclipse IDE you can deploy Salesforce metadata from one org to another but it involves more manual intervention.
- ANT: A free tool from Apache that can be used for scripting build operations and in the case of Salesforce, retrieve and deploy one Salesforce org’s metadata to any other org. ANT uses XML instructions to perform the appropriate operation like deploy, retrieve, list metadata and so on. ANT performs actions faster than other two.
Let’s see how we can use ANT to deploy or retrieve one Salesforce Org’s metadata to another org. The example below will describe a practical example of migration from one org to another org including code.
ANT uses XML instructions to perform the actions but to use it you don’t need to have prior knowledge of Java or Salesforce API’s (Metadata or any other), you just need a basic knowledge of XML and the ANT commands available. So let’s see a simple demo at work with ANT.
Steps:
- Before you install ANT you must first install the Java(JDK/JRE) minimum of 1.5.x version. The Salesforce documentation mentions that you should have Java version 1.7.x or later for better security and TLS support.
- If you have already installed Java on your machine confirm the version by typing ‘java version’ using the command prompt or terminal.
- Download the latest apache ANT (http://ant.apache.org/bindownload.cgi). This is the base package for all ANT related commands.
Extract it to C:\Software\ant - Once the download is completed, Extract this to a folder and give it a name with a proper destination path which we will use later to set environment variables.
- Since we are migrating metadata of one Salesforce org to another Salesforce org, we need some mechanism which understands Salesforce and can be used with the combination of ANT tools.
- This is why we need to download something called the Force.com Migration Tool.
- To download it simply follow the steps:
- Login to Salesforce (https://[login|test].salesforce.com)
- Navigate/Click on Setup
- Go to -> Develop -> Tools
- Click Force.com Migration Tool.
- It will download a zip folder named salesforce_ant_xxx.zip unzip this folder and store it on your computer. C:\Softwares\salesforce-ant
- The unzip folder contains the following:
- A Readme.html file that explains how to use the tools
- A Jar file containing the ant task: ant-salesforce.jar
- A sample folder containing:
- A codepkg classes folder contains SampleDeployClass.cls and SampleFailingTestClass.cls
- A codepkg triggers folder contains SampleAccountTrigger.trigger
- A mypkg objects folder contains the custom objects used in the sample examples
- A removecodepkg folder contains XML files for removing the sample examples from your organization
- An unpackaged folder contains package.xml
- A sample build.properties file that you must edit, specifying your credentials, in order to run the sample ant tasks in build.xml
- A sample build.xml file, that exercises the deploy and retrieve API calls
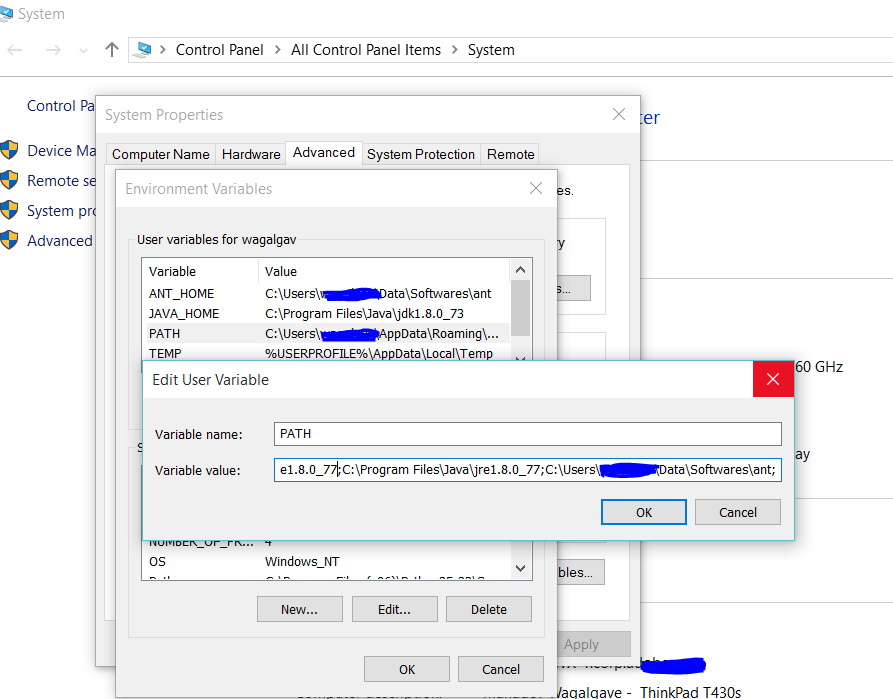
- You need to set the environment path variables which will help you to access ant tools from any folder through the command line.
- Create a ANT_HOME and JAVA_HOME variable in your system advanced properties section (In case Mac OS X and Linux systems you have to set these using command i.e. SET PATH or set $PATH whichever applicable)
- Please make sure that you don’t confuse yourself in setting path variables.
- The first step: Add JDK, JRE and ANT home folder path to OS PATH variable
- Ex: PATH = C:\Users\user1\Data\Softwares\ant\bin; C:\Users\user1\Data\Softwares\java\jdk1.8.1\bin; C:\Users\user1\Data\Softwares\java\jre8\bin;
- Create two new variables as mentioned above i.e. JAVA_HOME = C:\Users\user1\Data\Softwares\java\jdk1.8.1; and ANT_HOME = C:\Users\user1\Data\Softwares\ant;
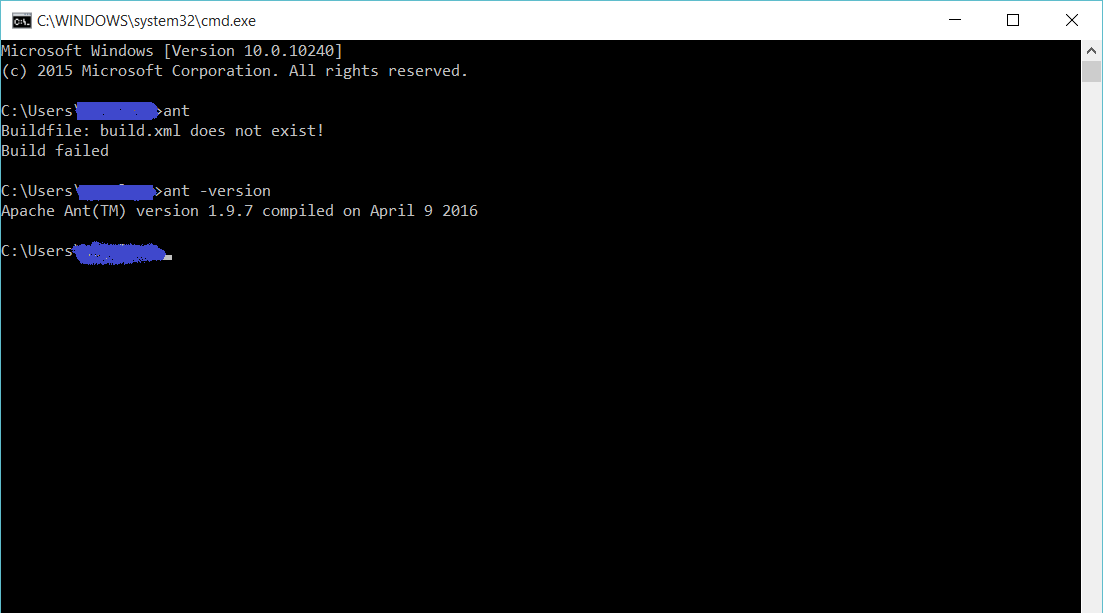
- Once you done with the above steps now it’s time to check if everything is all set to go.
- Open command prompt or terminal and type ant or ant –version and press enter.
- If you see the message you have successfully configured ANT on your machine else if the error message is that ANT does not exist, then your ANT installation was not successful or environment variables were not set properly.
- We have configured everything pretty much here but just make note that there is one more configuration remaining which we will cover later on in this post :)
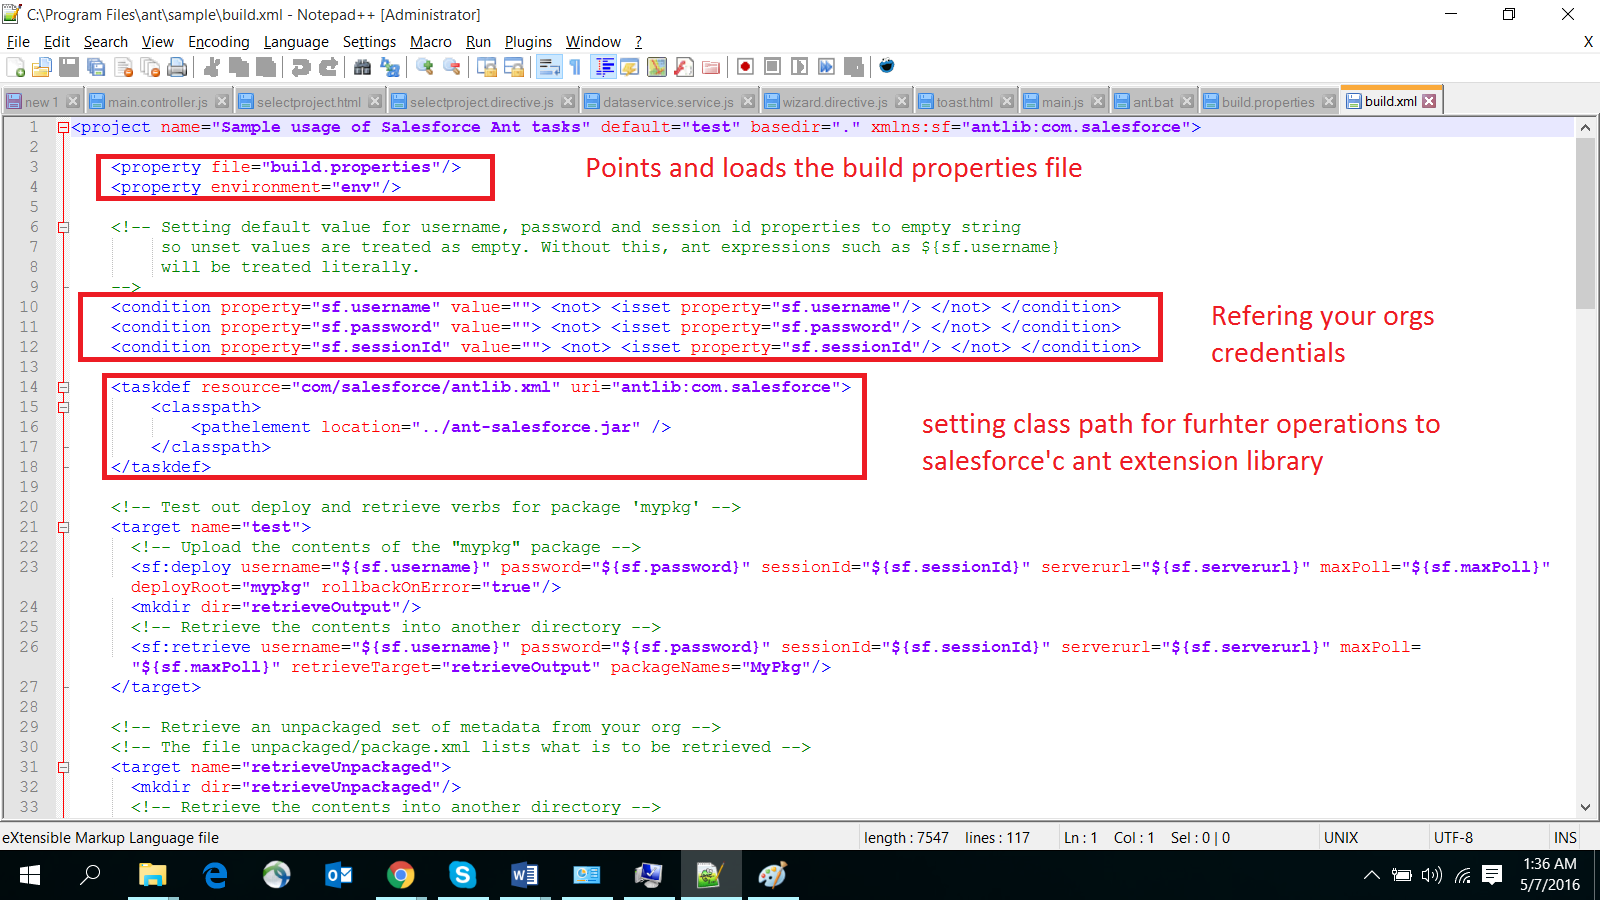
- To get started first let’s understand the important files available inside the salesforce-ant folder.
- The Salesforce Ant Migration Tool ant-salesforce.jar is an ANT extension that adds Salesforce-specific tasks to Ant. build.xml, the main file containing all the possible tasks to perform, here tasks that we might want Ant to perform for our project i.e. deploy, retrieve and so on in a specific format.
- When you give Ant a command, it will read the build.xml configuration file, searching for the target matching that name and once it finds it, it will execute it.
- We may wonder how ANT connects to our target Salesforce instance, that’s where an important file comes into the picture i.e. build.properties where you can specify the Salesforce instance details such as test | login, username and password with security token.
- This is how build.properties file looks like, provide your instance details there and save this file.
- Now it’s time to take a look at the build.xml file
- The build.xml file is a very good example with all the possible operations that can be done using ant. Read all the comments and you will understand everything there.
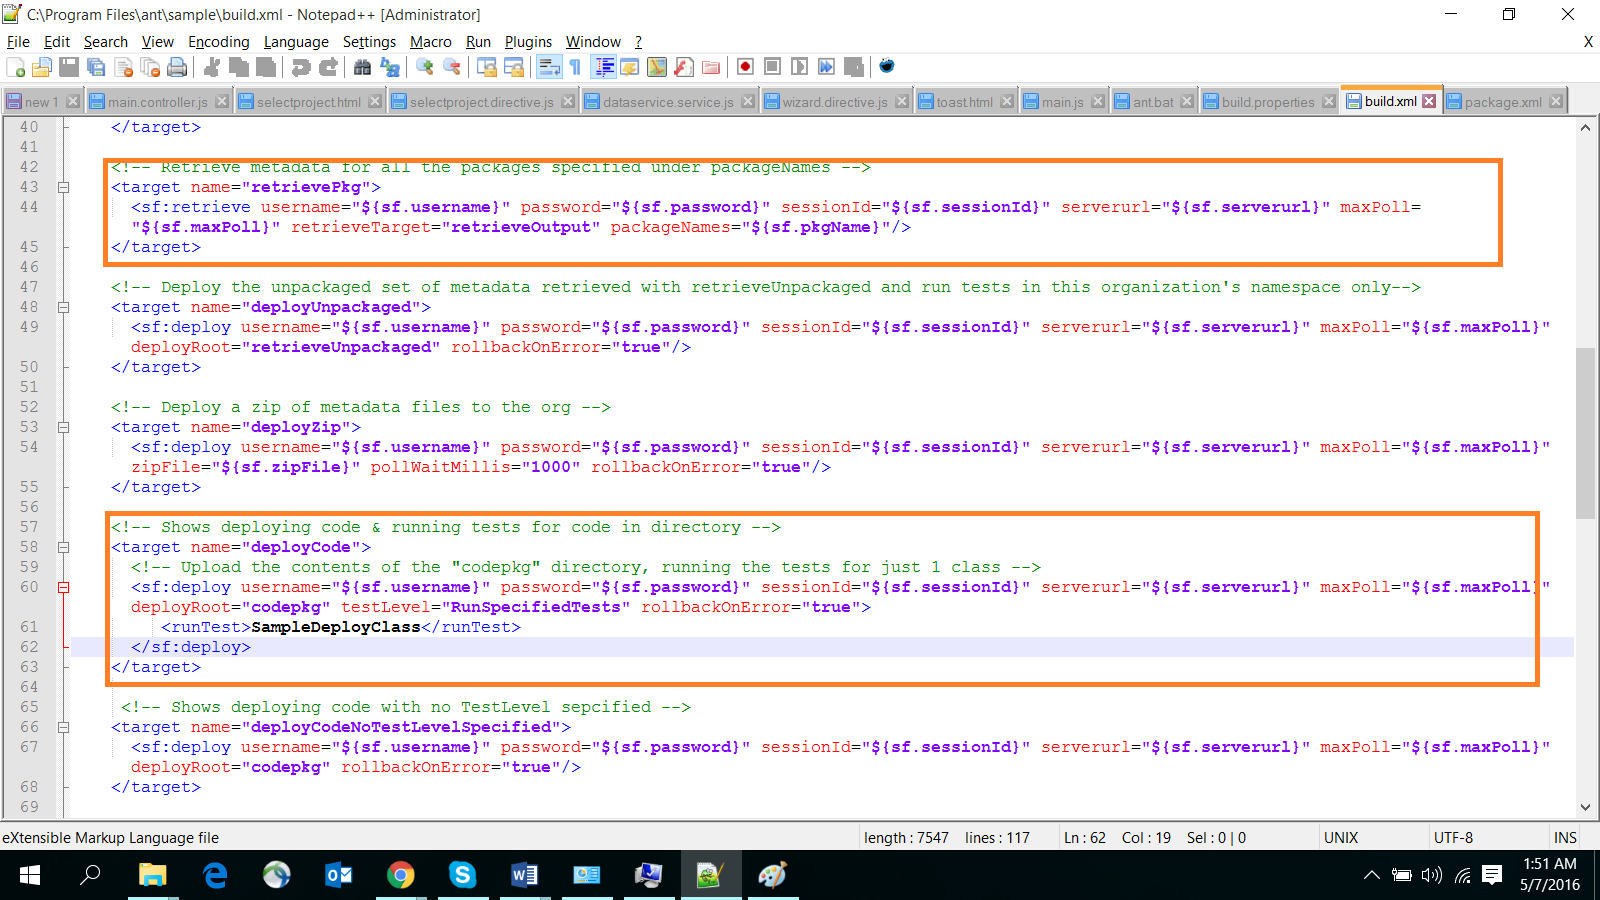
- The target names are nothing but ANT commands which we are going to use in a minute. Ex: deployCode, deployZip, retrievePkg and so on. These can be used with ANT as an option. Ex: ant deployCode
- Since in this example we are going to use retrieve and deploy operations we will focus on them.
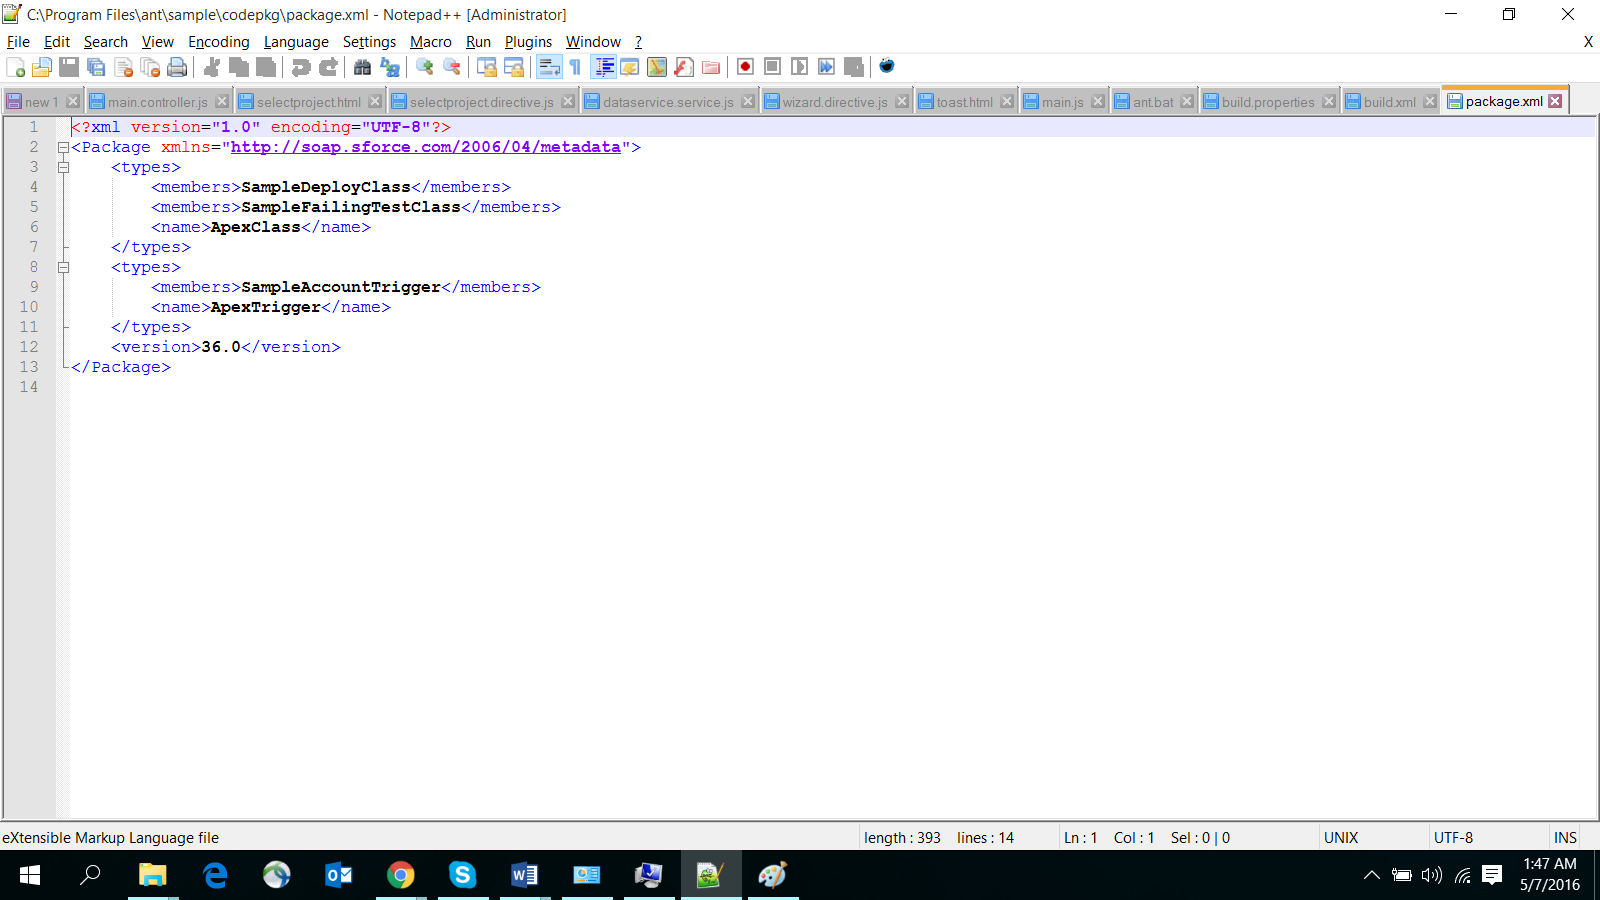
- You may have observed that every folder inside the sample folder contains the package.xml file which contains the info about what all classes, triggers, pages, objects you want to deploy or retrieve. In our example the classes folder package.xml contains.
- We are going to migrate code from the 1st org to 2nd, to proceed with this, we first need to identify all the components which want to migrate like Objects (Custom, Standard), Fields, Apex classes, pages and so on.
- Once the components are identified, we can make a list and put it into the package.xml file when we run ANT it will check for the package.xml file and list of components. See below screenshot for reference, you will get to know that we’ve to specify the components in element you can either specify individual component names or specify * for all components for that type like (ApexClass, ApexTrigger, Pages, and so on). For more info on component types (https://developer.salesforce.com/docs/atlas.en-us.api_meta.meta/api_meta/manifest_samples.htm)
- In this demo the following components will be migrated
- Card (Custom Object => Card__c)
- Custom Fields (Card No => CardNo__c, Card Holder Name => CardHolder__c, Expiry date => ExpiryDate__c, CVV => CVV__c, Type => Type => Type__c)
- Visualforce Page (DoPayment)
- Apex Class (AuthorizeNet, ProcessPaymentController)
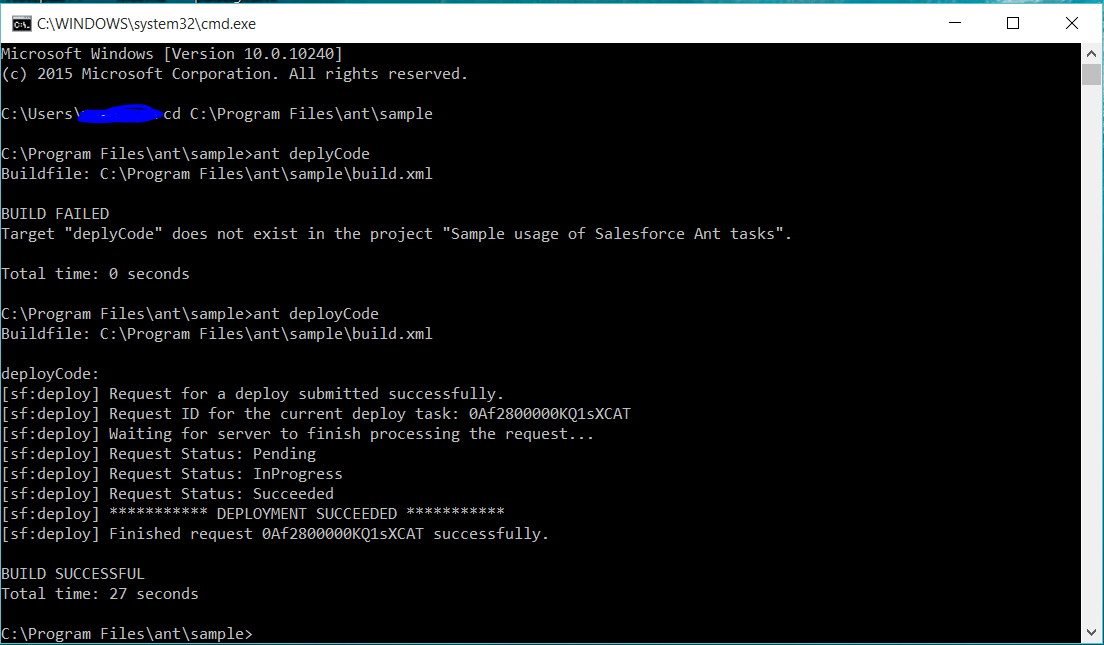
- Now the first step is to first retrieveCode from my first Org. to do this, open the command prompt and navigate to the path/directory where you want to retrieve the code.
- Let’s observe and understand build.xml tags, in this case we first understand the structure of retrieveCode tag.
- Now we can execute the ant command to retrieve all components, ant retrieveCode
- Once you hit enter, it will actually start executing the program and fetch all components mentioned in the package.xml and put into the target folder.
- As you can see in the screenshot, we got all the components in just 15 Seconds.
- Open the build.properties file and replace the credentials with second org credentials.
- Go to build.xml to see the configuration for deployCode tag
Now since we have completed the configuration part we will move on and see how this actually can be used with Salesforce!

In the above code focus on two most important attributes, retrieveTarget and unpackaged, the first attribute is for, where exactly (directory) you want to retrieve the code, in my case I am providing codepkg folder, the second important attribute is to specify the location of package.xml file, in my case I put that created/modified file inside the folder itself.

Since we fetched all the related components in a folder now, we want to copy the same code to my second org. In order to that follow the below steps:
- In the above element the most important attributes are deployRoot (path to the source code) testLevel to specify whether you want run all the test classes or specific test classes, rollbackOnError to rollback if any error comes.
- Now let’s deploy the code to the other org
- Open the command prompt and navigate until the you source code folder (where we saved our code).
- Enter command ant deployCode it will start deploying your source code to the specified Salesforce org. This runs using the deployAPI call, using the sample class and Account trigger provided with the Force.com Migration Tool. The ant deployCode calls the Ant target named deploy in the build.xml file.
- Things can go wrong on your end (e.g. Terminal quits, computer dies), don’t worry. As soon as are start a deployment, it is happening in the cloud.
- You cannot stop a deployment once it is started from a terminal. Control-C does nothing except stop Ant from reporting to your terminal window.
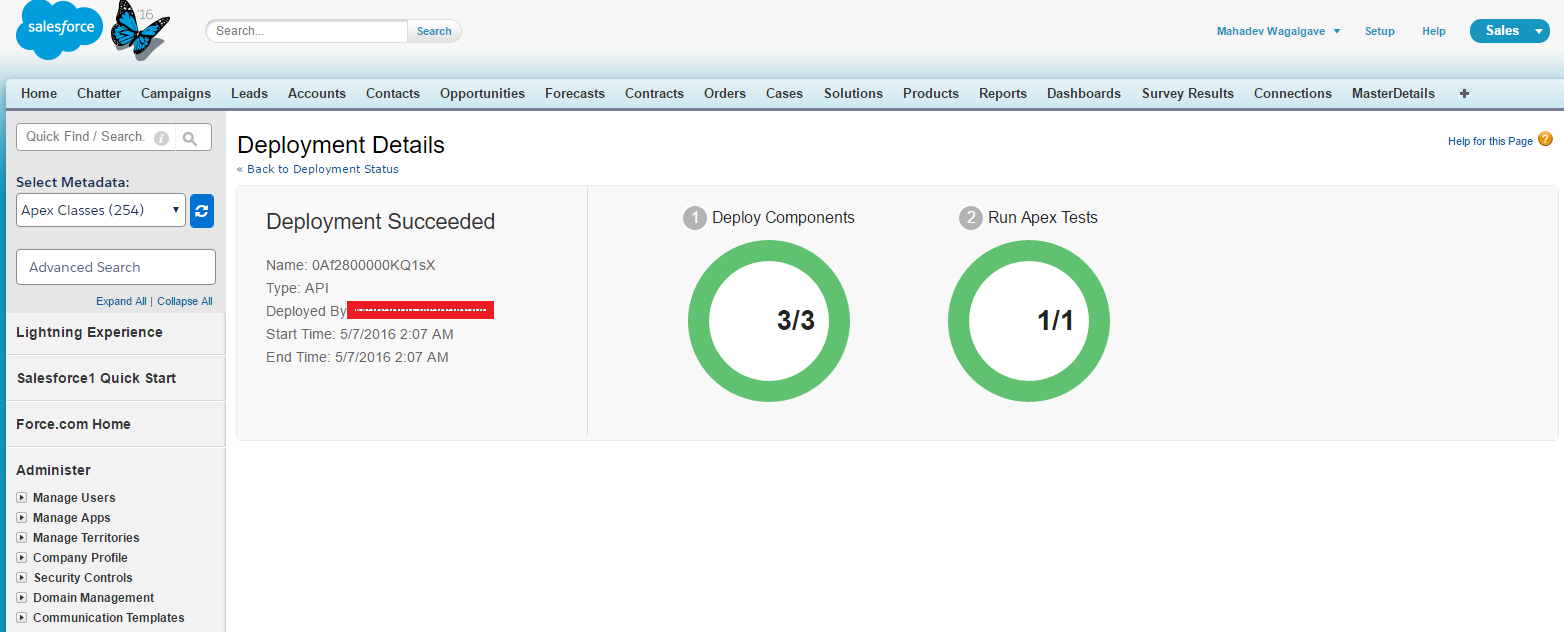
- To view the deployment status or terminate a deployment, you must log into Salesforce as a System Administrator.
- Once logged in navigate to Setup | Deploy | Deployment Status.
By using the same technique, you can perform other commands too.
What Certification are you studying for now?
Focus on Force currently provides practice exams and study guides for sixteen certifications