Have you ever had to perform the same action on multiple records in Salesforce? Wished there was a better way to save time? You may have thought about the possibilities in Microsoft Word or Excel to use macros to perform repetitive actions and wished there was something similar in Salesforce. Well, there is! There is a macro capability and, it is available for all standard and custom feed based objects. A macro can include actions like sending email, updating status, selecting templates, and creating tasks. In a single click, multiple actions can be performed on single or multiple records. Single clicks not only save time but also help achieving a consistent process. Time is money for support agents who handle multiple activities at a time.
Macros are more or less like a set of computer instructions which provide you functionality like sending email, updating field, creating tasks, etc. with a single click. Macros work with the feed based layout and to use it for any object, the feed needs to be enabled for that specific object. Macros, which can be added to any Lightning app in Lightning Experience, can be used on standard and custom objects that allow quick actions and have a customizable page layout.
So let’s save some time and clicks and see how to setup Macros. Before setting up Macros, we need to take into consideration a few things as below:
- Is feed tracking enabled for the object on which you need to setup Macros?
- Is a feed based page layout created for the object on which you need to setup Macros?
- Are all the publisher actions that you desire to setup through Macros added to the object?
- Is the Macros button already added to the Ligtning app?
- Are permissions granted for creating Macros?
In this example, we will setup a macro for the standard object “Opportunities”.
Enabling Feed Tracking
In order to enable feed tracking, go to Setup-> Feature Settings -> Chatter -> Feed Tracking or you can directly go to Setup and search for Feed Tracking in the quick find/search box on the left. Now select the “Opportunities” object and check the “Enable feed tracking” check box on the top. Also select the fields that you need to be tracked on the feed layout.
[infobox color=”#eded7b” textcolor=”#000000″]NOTE: You can select up to a maximum of 20 fields for feed tracking.[/infobox]
Feed Tracking
Creating a Feed Based Page Layout
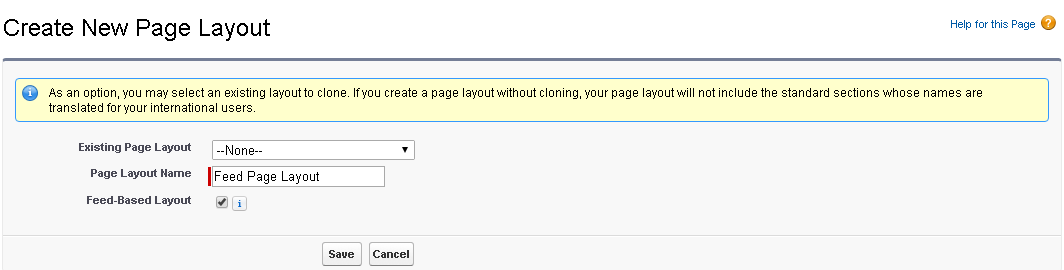
If a feed based page layout has not already been created for the Opportunities object, this step is required. Feed based layout creates separate tabs for the feed view and detail view for the page. Open the Opportunity object in the Object Manager in Setup, and then create a new page layout via the Page Layouts tab. After clicking create new you will see the screen below: provide a name for the page layout and check the “Feed-based layout” checkbox, and click next and save.
[infobox color=”#eded7b” textcolor=”#000000″]NOTE: You need to set the feed page layout in the page layout assignments as required.[/infobox]
Feed Layout Creation
Set Up Actions in Page Layout
If we need to use an Email action in macros, then we need to add Email action to the Opportunities page layout. Go to the page layout that has been created and add the quick actions by dragging and dropping to the quick actions section as in the screenshot below.

Salesforce Mobile and Lightning Experience Actions
Adding Macro to Lightning App
This will be the last step that needs to be performed for the setting up of Macros. Create a new Lightning App via the Apps Manager in Setup. Macros can easily be created by using the Macros utility that is added in a Lightning App. You can add this utility item to a Lightning App in Setup -> Apps -> App Manager. Then, in the App Settings -> Utility Items configuration tab of the Lightning App, click on the Add Utility Item button and search for “Macros” in the overlay search box provided. After selecting “Macros” in the search result, click on the Save button to finalize the change.

Macro utility added to the Utility Item in a Lightning App
Permissions required for Macros
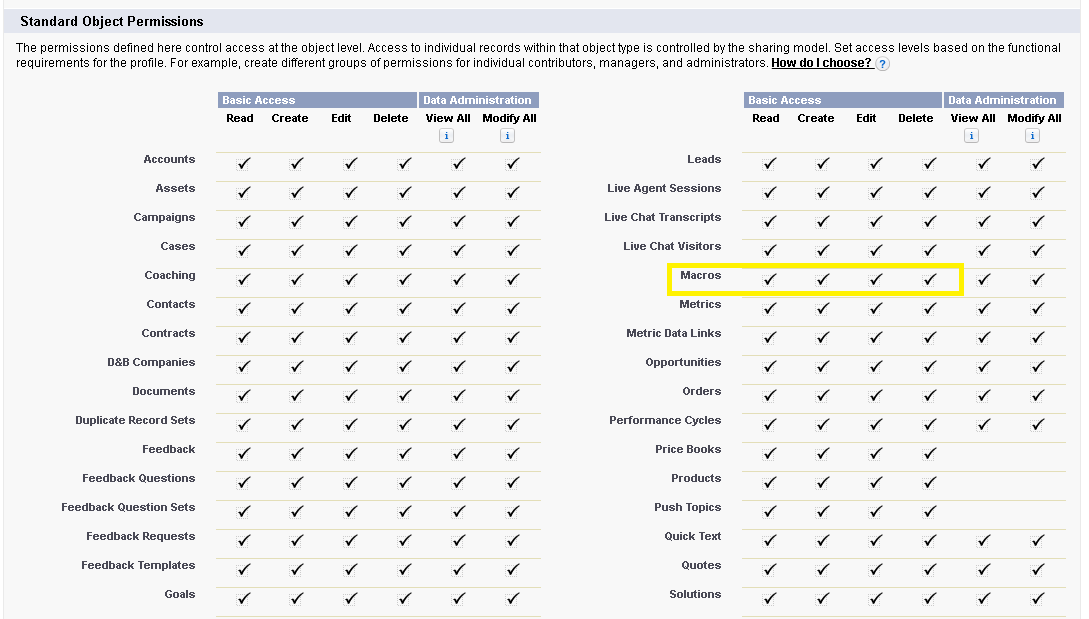
For any user able to create and edit Macros, the user profile should have the following permissions:
- To view Macros- “Read” permission on Macros object.
- To create and edit Macros- “Create” and “Edit” on Macros object.
Go to Setup-> profiles -> Select the profile for the user who should be able to create and edit Macros. Once the profile is selected go to “Object settings” and search for Macros and grant the read, create, edit and delete permission as required. In order to run “Bulk Macros”, you should also enable the “Run Macros on multiple Records” option under the system permissions for the profile.
Once the above tasks are completed we are all set to use Macros for the Opportunities object. Now in order to set up Macros, go to the Lightning App where the Macros tool was added to its Utility Item. In that Lightning App, you will notice a Macros button located at the footer of the page. To start creating a macro, open a record and click on that Macros button and then click on the Create Macro or “+” button provided in the window that pops up.

Clicking on the Create Macro button will open a Macro edit page for configuring the macro. Enter a name that defines what the particular macro is for. The ApplyTo field defaults to the object of the record where you click the macro button from. Click on the Save button.

Saving the macro brings you to a macro details page like the below. Click on the Edit Instructions button to instruct your macro what it needs to do.

Macro Instructions
After updating the macro with one or more instructions, switch to the Lightning App and open an Opportunity record, or return to the record which was accessed earlier. Click on the Macros button again at page footer, select the macro that was updated in Macro Builder. Then, click on the Run Macro button provided inside the window. You should see something like the illustration below and notice that, in this example, a new Task record has been created.

A new task for the opportunity should have been created after the macro was run. Running the macro using a single click spares one from having to perform multiple clicks and data entries to create the new task.

[infobox color=”#eded7b” textcolor=”#000000″]NOTE: A macro with a blue bolt indicates that these macro actions cannot be undone and a macro with green bolt and double lines under it indicates that it is a bulk macro which can be performed in increments of 10.[/infobox]
Bulk Macro
Similar to performing Macros on a single record we can perform bulk Macros. To do this we need to grant permission to “Run Macros on multiple records” which is symbolized with a green bolt along with two lines. To grant the “Run Macros on multiple records” permission, go to Setup-> select Profile -> App Permissions -> Check the “Run Macros on multiple records” checkbox and save it.

Once this permission has been granted you can select 10 records together and execute the macro. In order to run a bulk macro, select a minimum of 10 Opportunities as bulk macros can be performed in increments of 10 only. Once selected open the macros widget and you should see the Green bolt with double lines under it. Just click on run and it is done. With a single click, you will be able to apply the same macro to over 10 Opportunities. This would save a lot of time as compared to the conventional way of sending emails individually.
So that was how to create a Macro for any object. Macros are really a great way to save time and save clicks. Have you any examples of how you have used Macros in your Org?
What Certification are you studying for now?
Focus on Force currently provides practice exams and study guides for sixteen certifications


Hello all, Do we need to know about Bulk Macros for Admin exam please ?
Hello, Atef! Thanks for taking the time to reach out to us. Macros is not specifically mentioned in the official exam outline but it could be under the Service and Support Application or Process Automation categories. Having the basic knowledge of bulk macros (such as when and how to use them) would be beneficial not only for the exam but also for real-life applications.
Macros are available in Lightning now. This should be updated to reflect this: https://support.desk.com/customer/en/portal/articles/2926877-how-to-use-macros-in-lightning-console?b_id=16915#ClosedDtmPopup
Hi Michael, thanks for your suggestion. This article was published back in 2016, so we will definitely consider updating.