Creating Multiple Record Types
Creating brand new custom objects in Salesforce, while necessary, can be time consuming and tedious. Often times you will need to create a different page layout or new selections for a particular picklist field but the only way you know how to do this is create an entirely different custom object and customize it as needed. This is where creating multiple record types for one object come in to play, allowing you to customize various aspects of an object based on profile settings.
What are Record Types?
Record types allow administrators to configure different page layouts, business processes, and picklist values. It is important to note that record types are based on a user’s profile and not standard across the organization. Record types can be used in a variety of ways, from displaying different page layouts for one object based on a set of criteria, to displaying different picklist values based on the user creating the record in question.
NOTE: Record types do not influence record level security. Meaning, if a user does not have permission to view/edit an object (or field within that object) in their profile settings they will not have the ability to view/edit that object even if a record type is made available to their user profile.
Adding Record Types to Profiles
Profiles can be associated with one or more record types. This can be done when creating the record type, or later when editing a specified profile. When more than one record type is available you must choose a default for each profile. The default record type should be the one which is used most often, and will therefore be the primary selection for users. Profiles associated with only one record type will never be asked to select a record type when creating a record. This will make more sense once we go through the example below.
Setting a Default Record Type
When you have created multiple record types you can set one record type as the default for each user profile. This comes in handy if users tend to use one record type much more often than others. This can be done with the following steps:
Manage Users ->Profiles (select a profile) -> Object Settings (select the object) ->Edit ->Select from the available list of record types
Multiple Record Types Example
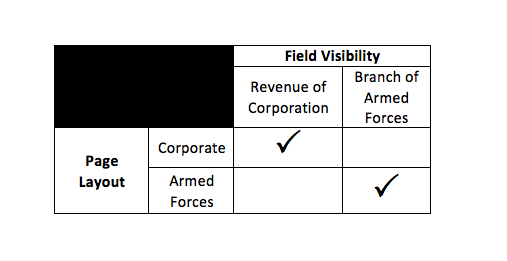
Your organization works with two types of clients, corporate and armed services, and therefore sees these as two separate account types. For corporate accounts you will need to capture the size in revenue of the corporation, while for armed forces accounts you will need to capture the branch of armed forces of the account. We therefore need to create two record types for the account object with two different picklist field options for each.
Understanding the Scenario
Because we are have two different account types, Corporate and Armed Forces, as well as two different fields we want to capture for each, it makes sense to create two record types and page layouts for each of these account types. We want the appropriate picklist field to be visible only when creating the appropriate account type. As we can see in the table below, visibility of each field is only necessary when creating the account type in association with that field.
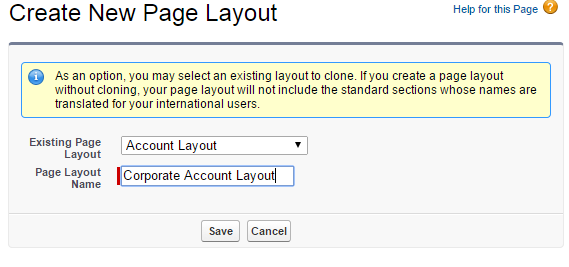
Step 1 – Create Page Layouts
- From the setup screen, click Customize -> Accounts -> Page Layouts
- Click New
- Select an existing page layout to clone, or start from scratch. It is much easier to clone from an existing layout and you can always delete what is not needed from the cloned layout.
- Select a Page Layout Name, for our corporate accounts we will call this Corporate Account Layout
- Click Save
- Quick Save the page layout as is, there are no changes needed to make on the layout at this time.
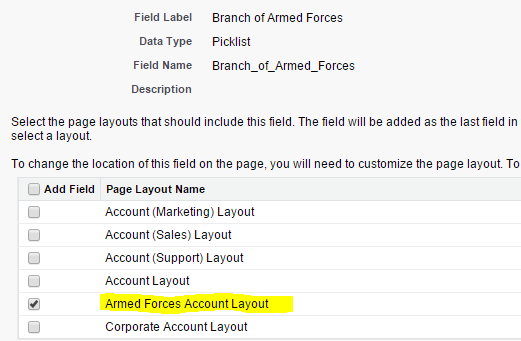
- Repeat steps 1-7 for our armed forces accounts. Naming the layout Armed Forces Account Layout.
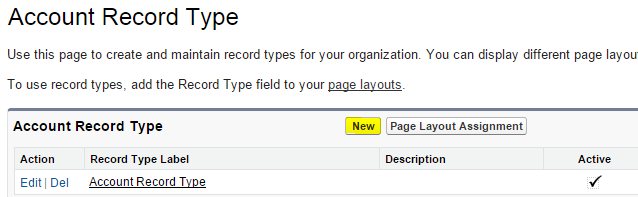
Step 2 – Create Record Types
- From the Setup screen, click Customize -> Accounts -> Record Types
- Click New
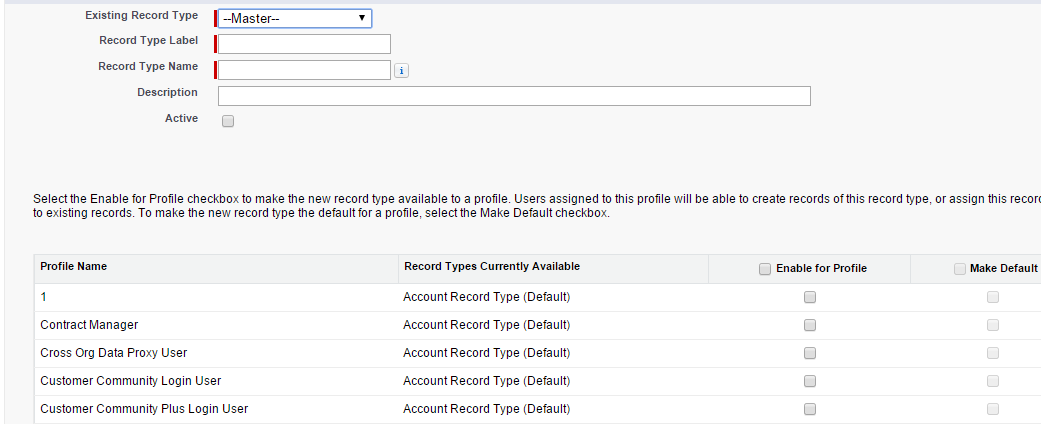
- Select Master from the Existing Record Type drop-down list to copy all available picklist values.
- Create a Record Type Label named Corporate Account along with an optional Description if desired.
- Make sure to select the Active checkbox in order to activate the record type. If this is not selected your new record type will not be available to users.
- Select Enable for Profile for all profiles since we are not putting restrictions to this page layout based on user profie. The record type must first be enabled for the profile in order to have the option of making it the default selection.
- Click Next
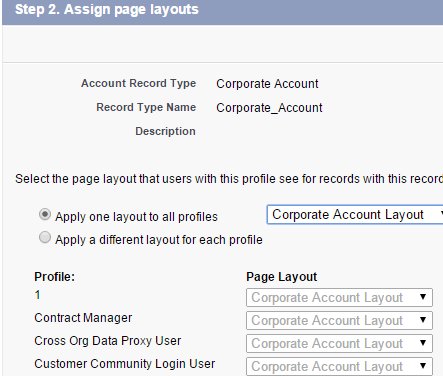
- Pick the Corporate Account Layout option and apply to all profiles.
- Save
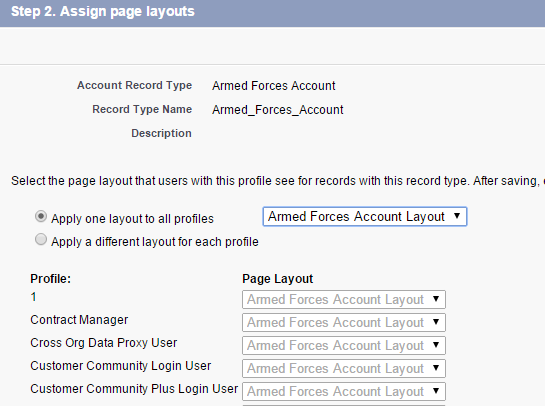
- Repeat steps 1-9, creating a page layout named Armed Forces Account and assigning it to the Armed Forces Account Layout
Step 3 – Create Picklist Fields and set Page Layout Visibility
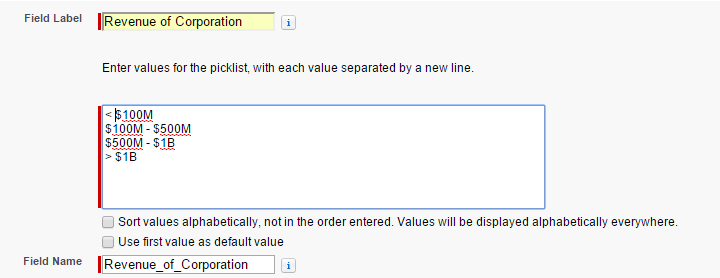
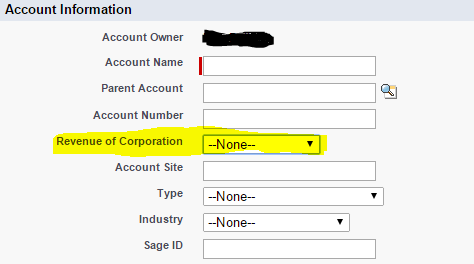
- Create picklist fields on the account object for Revenue of Corporation with picklist values as: <$100M, $100M – $500M, $500M – $1B, >$1B
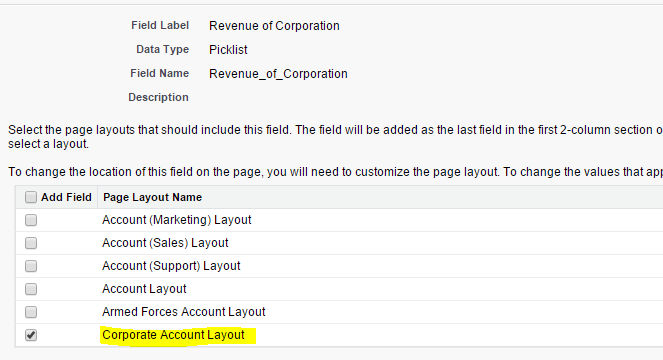
- This field can be visible to all profiles since we do not have any restrictions on its user visibility.
- Only enable the field for the Corporate Account Layout page.
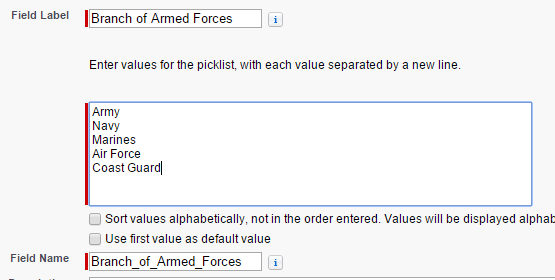
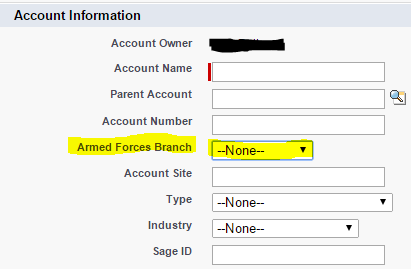
- Create a picklist field on the account object for Branch of Armed Forces with picklist values as: Army, Navy, Marines, Air Force, Coast Guard
- This field can be visible to all profiles since we do not have any restrictions on its user visibility.
- Only enable the field for the Armed Forces Account Layout page.
NOTE: Make sure the Revenue of Corporation field is not on the Armed Forces Account Layout as it is not necessary for these types of accounts. Additionally, make sure that the Branch of Armed Forces field is not on the Corporate Account Layout for the same reason. Refer to the previous chart in the Understanding the Scenario section for more details.
Step 4 – Test by Creating a New Account
In order to see if we completed all of the steps correctly we must confirm that there are now multiple record types, and the visible fields on each record type correlate to the appropriate page layout.
- Go to Account -> New
The following screen should appear
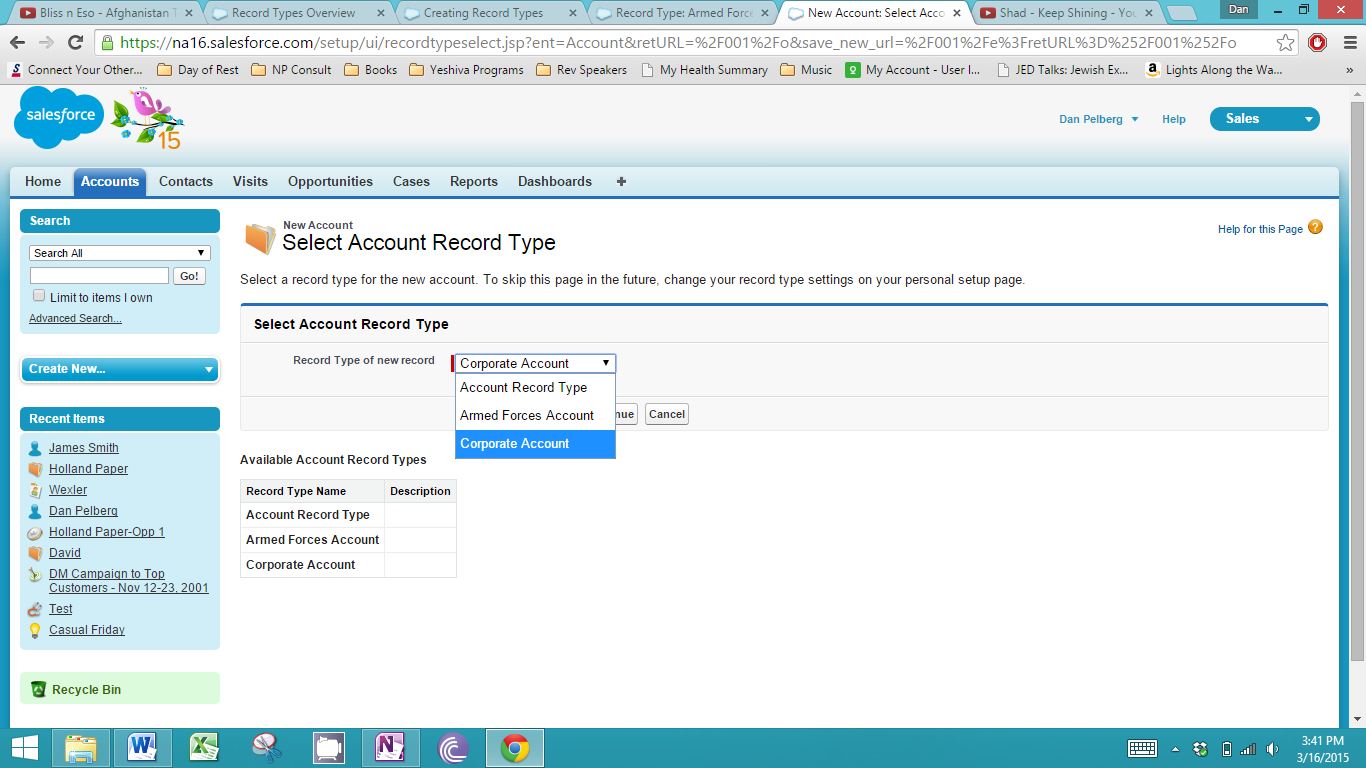
- Select the Corporate Account option from the drop-down menu
- Confirm that the Revenue of Corporation picklist field is visible on the page layout, and the Branch of Armed Forces field is not visible.
- Repeat steps 1-4 selecting the Armed Forces Account record type and confirming the Branch of Armed Forces field is visible on the page layout.
You have now created two separate records types and page layouts that display the correct fields. Now, whenever you attempt to create a new account you will decide between a Corporate and Armed Forces record type and in turn be routed to the correct page layout.
User Default Record Types
If a user is always using the default record type, it is possible to always use this record type when creating a new record and not be prompted using the ‘Set Default Record Types‘ option under My Settings.
What Certification are you studying for now?
Focus on Force currently provides practice exams and study guides for sixteen certifications


Thank you! This was helpful!!