By: Warren Mangahas
With an ever-expanding number of social media platforms, the need for companies to accommodate third-party logins is increasingly paramount. Even if you have a fantastic Salesforce Community set up, full of valuable resources and a vibrant user-base, the idea of having to sign up on another site and memorize another password may just be enough to turn someone off from signing up. This is where Salesforce Social Sign-On is key.
Social Sign-On can be used a few ways, but in this article we will be focusing on allowing users to quickly and easily access your Salesforce Community, and also adding in custom logic to your RegistrationHandler class to capture attributes in Salesforce to help you build your customer profile. Salesforce supports many of the top social identity providers in the world, including Facebook, LinkedIn, Google, etc. Today we will be using Facebook as our example login partner.
[infobox color=”#d6d2d2″ textcolor=”#081e1c”]In order to move forward with this demo, you will need to set up a Salesforce Community, and a Facebook App. I won’t go into the details on how to set up Communities, but here is a great guide you can follow from Salesforce:Resource Guide[/infobox]
Now that we have our Community set up, we can start to set up our Facebook App and add it as an Authentication Provider in Salesforce. Salesforce has created another amazing guide on how to set this up, so you can follow this and I will provide details on important things on how you can begin to extend this functionality and how the Registration Handler Class works: Resource Guide
Getting Data from Facebook
If you follow that Salesforce guide as it is printed today, and you used the system-generated Registration Handler class, you would have noticed that the email address and other data points were always null. While this would not prevent your users from logging in the first time, it would certainly make it impossible for you to allow the user to login again and access their account. The default “User-Info Endpoint” is this:
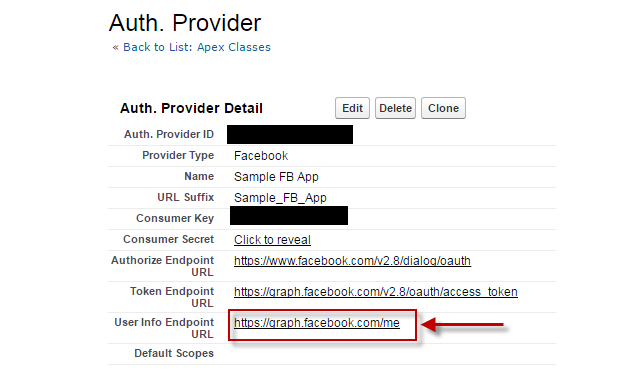
However, according to the graph API documentation, Facebook does not send all fields by default. If there is something in particular you are looking for, you should specify those fields. As a result, I recommend changing this endpoint to this:
https://graph.facebook.com/me?fields=first_name,last_name,email,link
This will pass the user’s name and email address info. We can use the email address in our Registration Handler to be the unique key we use to either create a new User, or return an existing User.
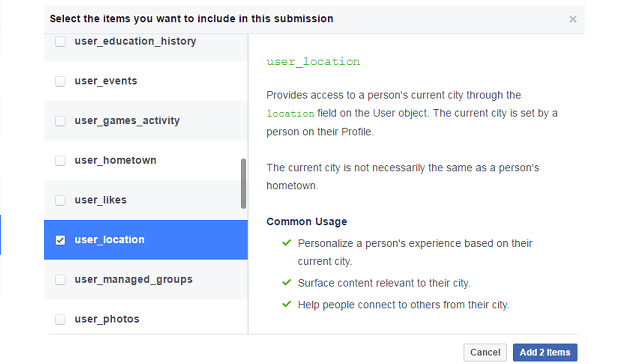
Also, if you want to gain access to other user information through your Facebook App, you can Submit a Request to Facebook through your Developer Dashboard for the items you are interested in. For example, you can request to get access to the user_location attribute in Facebook so that you can store this on the user and show them relevant content on your community.
Extending the Registration Handler Class
I have attached my sample registration handler class below. There are a few things to note that are particular to my class that deviate from the standard auto-generated class from Salesforce.
- The attributes that we specified in the User-Info Endpoint can be accessed through the data.attributeMap item. In particular, you can reference first_name, last_name, and email as keys to get the user information.
- I created a custom field called Social_Login_ID__c to capture the unique identifier from the authentication provider. This isn’t a necessary step, but it doesn’t hurt.
- I created an Account called “Facebook Created Accounts” to be used as the Account on all the new Contacts created through the community.
[infobox color=”#d6d2d2″ textcolor=”#081e1c”]The createUser method is what is run by the system when they attempt to log in to the Community using Facebook. Through this simple code snippet below, you can see that we take the email address from the Facebook profile, and return the user with the matching email address if one exists. If not, we continue with the new user creation.[/infobox]
[crayon-60c959ff81f6c793378318/]What we did in this article is a very simple example, but it illustrates how you can gather information from a Facebook Profile and use it in your community. You can very easily expand this by adding additional information to your Facebook App and sending that information to Salesforce.
Some examples which can really help to create a rich Community experience include importing a profile picture, collection location information so that if Sales or Customer Service activities are required, they can be directed to the nearest Sales Rep or Support Team, etc.
Full class code below:
[crayon-60c959ff81f72238748703/]Getting the User’s Facebook Profile Picture and Uploading to Salesforce
You can collect the profile picture from the Facebook Account that is being used to login by adding this parameter to your User Info Endpoint URL:
https://graph.facebook.com/me?fields=first_name,last_name,email,link,picture.type(large)
When you view this data point in your data attributeMap, it looks like this:
{data={is_silhouette=false, url=https://scontent.xx.fbcdn.net/v/t1.0-1/p50x50/14595768_10154107646618040_8996838738001558084_n.jpg?oh=194efbbd098a481e14dd198e8faf77b8&oe=58AEAA3C}}
So with that we will need to do some text manipulation to get just the URL. Once we do that, we simply need to make a HTTP GET to that URL and upload that image as a blob to the user’s Salesforce profile picture using the ConnectAPI.UserProfiles.setPhoto method.
Full code sample here:
[crayon-60c959ff81f74927528560/]The Final Product
Here is what the final login process looks like.
1. The first page you will see is the main community page before you login: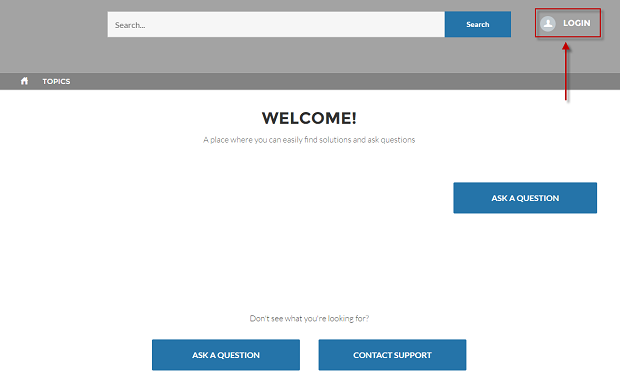
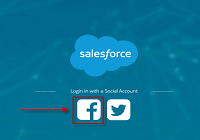
2. Once you clicked on Login from the main community page you will reach the login page: 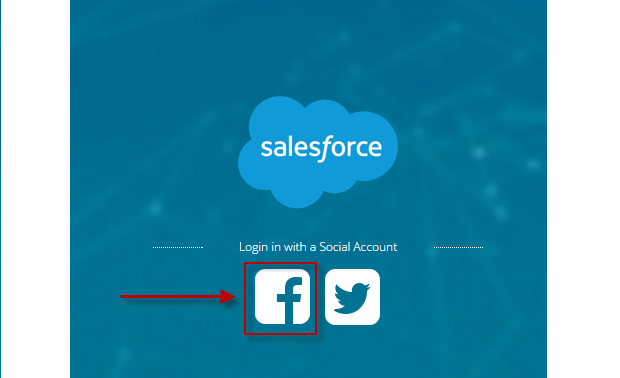
3. Once you have clicked login you will then be forwarded to Facebook to login page: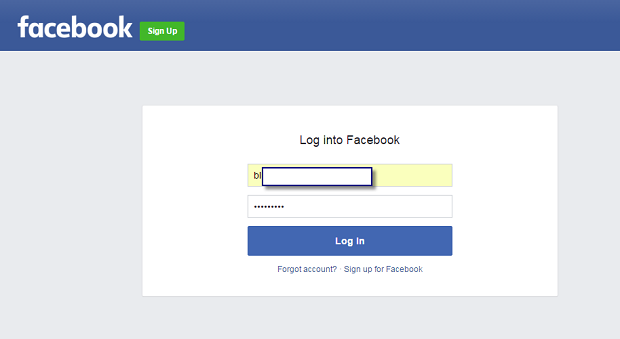
4. Upon login to Facebook, the Registration Handler class will see that there are no users with that email address, so it will create a new Community User using the name and email address from the Facebook account: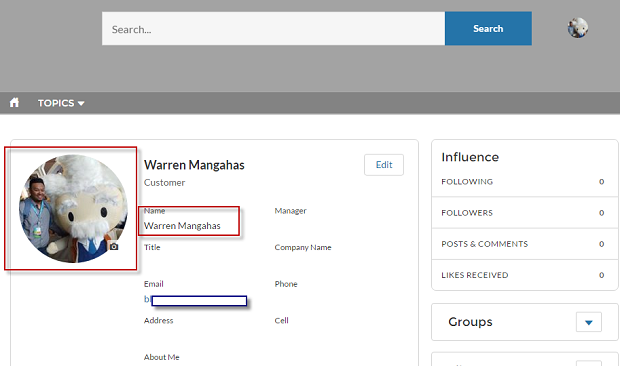
5. Now in Salesforce, you will see a new Contact and User that you can manage: 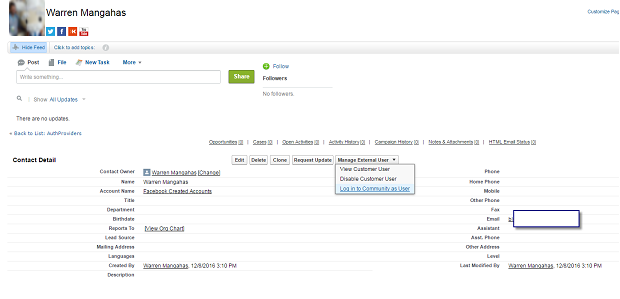
Useful Links:
Salesforce Social Sign-On: https://developer.salesforce.com/page/Social-Sign-On
Facebook App Creation: https://developers.facebook.com/docs/apps/register


