✓ Pagination
✓ Filtering
✓ Sorting
✓ Quick filtering open Opportunities
In order to implement this we need four steps:
STEP 2: Build a VF table to display opportunities.
STEP 3: Connect the jQuery Datatables plugin.
STEP 4: Implement a custom filtering checkbox
STEP 1: CREATE AN APEX CONTROLLER EXTENSION
We need a standard controller extension because we would like to use standard controller features and extend it with custom code. Create a new Apex Class and name it AccountDetailsExt
[crayon-6114ad4d59def065003082/]Here are the details:
- public List<Opportunity> opportunities { get; set; } – Here we define a list of opportunities to be used further on.
- public AccountDetailsExt(ApexPages.StandardController stdCtrl) – This constructor has an incoming standard controller variable, it’s necessary to use this controller as an extension.
- Account acc = (Account) stdCtrl.getRecord(); – In this step we grab a parent account record from standard controller.
- opportunities = [SELECT Id, Name, StageName, Type, IsClosed FROM Opportunity WHERE AccountId = :acc.Id]; – Fill the list with all of the opportunties related to the account.
STEP 2: BUILD A VF TABLE TO DISPLAY OPPORTUNITIES
Now we can implement the Visualforce part and replace the standard related list with it. This section replaces the standard related list tag within the AccountDetails Visualforce page. Here is the markup:
[crayon-6114ad4d59df4892612925/]As you can see, it’s based on the pageBlockTable tag. Here are some key points.
- <apex:pageBlockTable id=”oppTable” value=”{!opportunities}” var=”opp” > – The main tag that determines the table.
- id=”oppTable” – ID of table. It will be used to connect Datatables plugin to the table.
- value=”{!opportunities}” – A scope of opportunities which should be displayed in the table. It gets them from controller extension property;
- var=”opp” – It defines the loop variable.
- <apex:column headerValue=”Action” > – it defines a table column and it’s header. Inside it we define the column content.
- <apex:outputLink value=”{!URLFOR($Action.Opportunity.Edit, opp.Id [‘retURL’=$CurrentPage.url])}” > – It defines a link inside column, the value attribute contains an action (edit in this case). Let’s see the formula details:
- URLFOR is the function that generates a dynamic URL for the supported actions. In this case we used $Action.Opportunity.Edit action ($Action is a global variable can be accessed from any Visualforce page).
- opp.Id parameter defines opportunity, it should be edited.
- [‘retURL’=$CurrentPage.url] array defines a list of page parameters transferred to edit page. In this case it’s retURL parameter that allows us to return back to account details on Save or Cancel action.
- <apex:column headerValue=”Type” value=”{!opp.Type}” /> – The column definition. value=”{!opp.Type}” the attribute just grabs opportunity field from variable. It can be used if no complex content needs to be displayed (such as links, images. etc.).
STEP 3: CONNECT THE JQUERY DATATABLES PLUGIN
Now we just have to connect our controller extension to the page. Let’s update the main Apex page tag:
<apex:page standardController=”Account” extensions=”AccountDetailsExt” tabStyle=”Account” title=”{!Account.Name}”> – It adds the controller’s name to the extensions attribute.
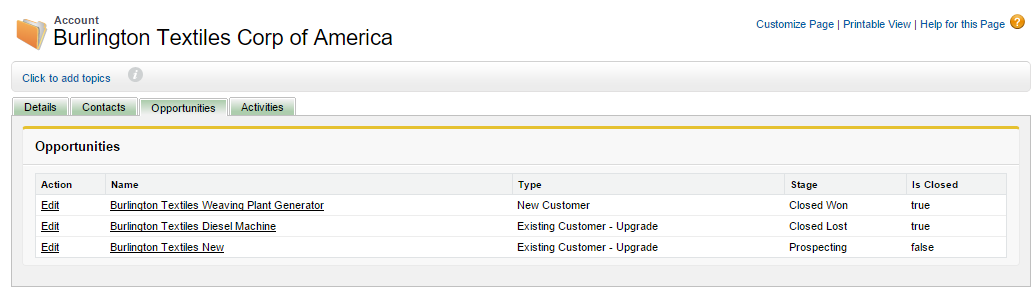
Let’s see the result on the figure 1:
What’s next? Let’s connect jQuery and Datatables plugin. To do this we need define it’s source:
[crayon-6114ad4d59df6802258591/]The first item loads jQuery library. The second and the third ones loads Datatables plugin and it’s CSS styles. In order to follow the best practices we need to put this files into static resources.
Now we need create our table and wrap it in the Datatables plugin by adding some Javascript code:
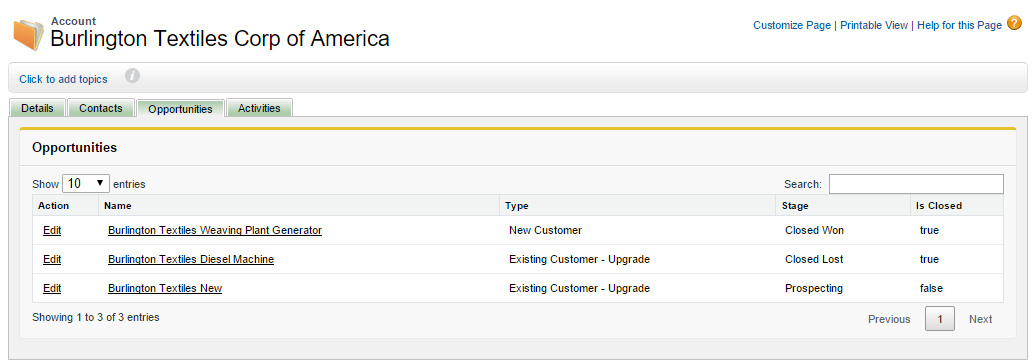
[crayon-6114ad4d59df7423763483/]This code (1) defines a jQuery variable, the variable that will contain our table (will need in the next step), (2) then it defines a function that calls the table and applies the plugin to it, and lastly, (3) it calls this function to modify Visualforce. Let’s check the result:
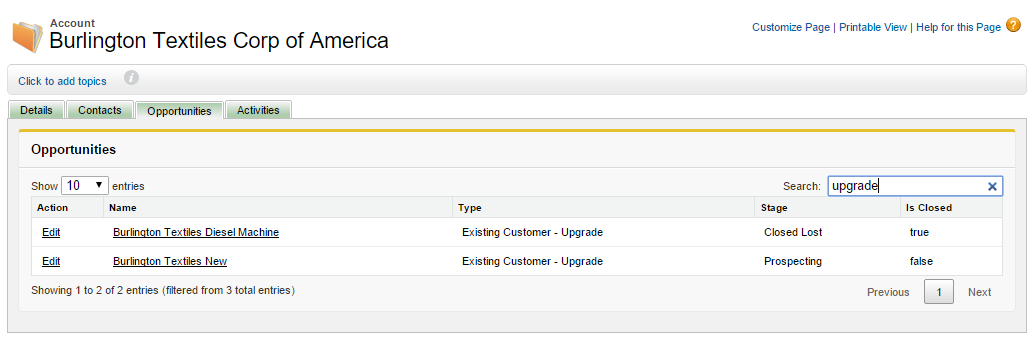
Let’s test the search feature, enter any word in the search bar, and search by column, value, or time.
STEP 4: IMPLEMENT A CUSTOM FILTERING CHECKBOX
Only one thing is remaining, adding a a checkbox for custom filtering, this is done with IsClosed field by using the following markup:
[crayon-6114ad4d59df8582271690/]As you can see, it’s quite simple, and to make it work we just need to add some more Javascript:
[crayon-6114ad4d59dfb186402874/]This code adds one more function to plugin’s handlers, the main thing is determining if the checkbox is selected and fi it’s filtering by IsClosed field:
[crayon-6114ad4d59dfc743727439/]This part checks if checkbox is checked and IsClosed opportunity field is false. If all is true, then the record is allowed to display.
[crayon-6114ad4d59dfd579838651/]If checkbox is unchecked–not filtering–then any record will be displayed; and if no result has been returned before, then it will return false, which means that the record should be hidden.
Another code to handle checkbox clicking:
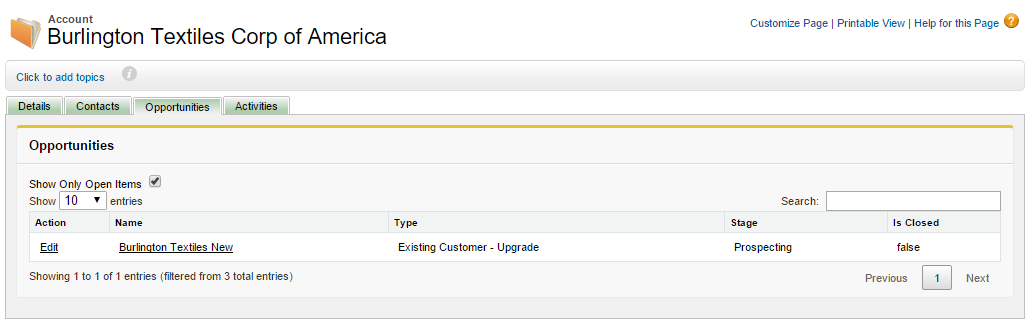
[crayon-6114ad4d59dfe255223805/]This code adds a listener to the checkbox and redraws the table to apply custom filter. Let’s save the page and see the result:

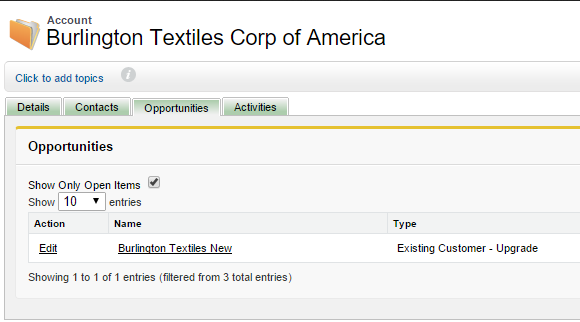
If we check “Show Only Open Items” checkbox, then only open opportunities stay on the table:
Some additional advantages of this approach
✓ A rich related list with all necessary functionality.
✓ We avoid a using lot of code.
✓ We used the client’s side logic, so all operations are processed quickly
Below is the complete Visualforce code.
[crayon-6114ad4d59dff975192096/]What Certification are you studying for now?
Focus on Force currently provides practice exams and study guides for sixteen certifications