Salesforce Reports provide a variety of formats and options to enable us to build reports from our data. However, sometimes we cannot achieve exactly what we need either in terms of the way the data is presented, or having a requirement to report on data that is not related in a way that can be consolidated in a report. That is when we may consider a Visualforce report. A Visualforce report is Visualforce page, that allows us to enter selection criteria and options, and use APEX to retrieve the data and present it back to us in a Visualforce page. Although this requires development skills to create and maintain, it is an option worth investigating if the standard reporting tools do not satisfy your requirements.
The following example explains how a Visualforce report can be built to report on Opportunities and the related Opportunity team. It has been kept relatively simple, and yes the same data could be extracted from a standard report, but just not presented this way, with the Opportunity Team data in the same row as each Opportunity. It also demonstrates how filters can be applied to the data.
Step 1: Create the page and controller
We need to start by creating a Visualforce page and controller. This needs to be a custom controller as this page doesn’t relate to any specific record.
We need two list of opportunities, one will be our master list that we query in the constructor and this is the list we base our filter from. The second list is the filtered opportunities, these are the ones we want displayed on our page. When the page loads, we want all the opportunities to be displayed so in the constructor we initialize this list as a copy of the list of all opportunities.
public class OpportunityReportCont {
	public List allOpportunities {get;set;}
	public List displayOpportunities {get;set;}

	public OpportunityReportCont () {
		allOpportunities = new List();
		allOpportunities = [SELECT Id, Name, Type, Amount, CloseDate, Description, ExpectedRevenue, ForecastCategoryName, LeadSource, NextStep, Probability, TotalOpportunityQuantity, StageName FROM Opportunity];

		displayOpportunities = new List(allOpportunities);
	}
}
Our Visualforce page has a table that displays the list of Opportunities in the display Opportunities list. We put all the fields we want displayed as columns in apex:column tags within a page block table.
<apex:page <apex:page controller="OpportunityReportCont" tabstyle="Opportunity">
	<apex:sectionheader title="Opportunity Report" subtitle="Opportunities" />
	<apex:pageblock title="Opportunities" id="opportunityTable">
		<apex:pageblocktable value="{!displayOpportunities}" var="o">
			<apex:column value="{!o.Name}" />
			<apex:column value="{!o.Type}" />
			<apex:column value="{!o.Amount}" />
			<apex:column value="{!o.CloseDate}" />
			<apex:column value="{!o.ExpectedRevenue}" />
			<apex:column value="{!o.ForecastCategoryName}" />
			<apex:column value="{!o.LeadSource}" />
			<apex:column value="{!o.Probability}" />
			<apex:column value="{!o.StageName}" />
		</apex:pageblocktable>
	</apex:pageblock>
</apex:page>
Step 2: Create the filter
To create the filter we create a dummy opportunity object that we pass from the controller to the page. We use this to capture the input values and take advantage of the Salesforce standard way of displaying fields. Doing this means we only have to specify the field we want, and Salesforce manages the type of control including any picklist values. As we are using this object to pass data back to the controller the fields need to be wrapped in apex:form tags.
public class OpportunityReportCont {
	public List<Opportunity> allOpportunities {get;set;}
	public List<Opportunity> displayOpportunities {get;set;}
	public Opportunity filterOpportunity {get;set;}

	public OpportunityReportCont () {
		allOpportunities = new List<Opportunity>();
		allOpportunities = [SELECT Id, Name, Type, Amount, CloseDate, Description, ExpectedRevenue, ForecastCategoryName, LeadSource, NextStep, Probability, TotalOpportunityQuantity, StageName FROM Opportunity];

		filterOpportunity = new Opportunity();
	}
}

<apex:page controller="OpportunityReportCont" tabstyle="Opportunity">
	<apex:sectionheader title="Opportunity Report" subtitle="Opportunities" />
	<apex:form >
		<apex:pageblock title="Filter">
			<apex:pageBlockSection >
				<apex:inputfield value="{!filterOpportunity.Type}">
				</apex:inputfield>
				<apex:inputfield value="{!filterOpportunity.LeadSource}">
				</apex:inputfield>
			</apex:pageBlockSection>
		</apex:pageblock>
	</apex:form>
</apex:page>
Now for the filter. We want to display only those opportunities that match the filter Opportunity dummy record that we create. To do this we loop through our master record of opportunities and compare them to each field we want from the dummy filter Opportunity. We want to check first of all that the field is not null (or an empty string) this means that nothing has been selected as the filter. If they match we add it to the list of display opportunities.
public void filter(){
	displayOpportunities = new List();
    for(Opportunity o : allOpportunities){
	    if (filterOpportunity.Type == o.Type){
		    if (filterOpportunity.LeadSource == o.LeadSource){
			    displayOpportunities.add(o);
		    }
		}
	}
}
On the Visualforce page we add action support to the filter fields, this tells the controller that we want the filter method to be called when the field changes, and then we want to rerender the table of our Opportunities.
<apex:inputfield value="{!filterOpportunity.Type}">
	<apex:actionsupport event="onchange" action="{!filter}" rerender="opportunityTable" />
</apex:inputfield>
Step 3: Getting the related OpportunityTeamMember records
In the controller we need to query all the opportunity team member records related to the opportunities we have and create a map from Opportunity Id to a list of Opportunity Team Members.
public class OpportunityReportCont {
	public List allOpportunities {get;set;}
	public List displayOpportunities {get;set;}
	public Opportunity filterOpportunity {get;set;}
	public Map> opportunityTeamMemberMap {get;set;}

	public OpportunityReportCont () {
		allOpportunities = new List([SELECT Id, Name, Type, Amount, CloseDate, Description, ExpectedRevenue, ForecastCategoryName, LeadSource, NextStep, Probability, TotalOpportunityQuantity, StageName FROM Opportunity]);

		filterOpportunity = new Opportunity();

		displayOpportunities = new List(allOpportunities);

        opportunityTeamMemberMap = new Map>();
		for(Opportunity o : allOpportunities){
		    opportunityTeamMemberMap.put(o.Id, new
            List());
		}
		List oppTeamMembers = new List([SELECT Id, OpportunityId, UserId, User.Name, TeamMemberRole FROM OpportunityTeamMember WHERE OpportunityId IN :opportunityTeamMemberMap.keyset()]);
		for(OpportunityTeamMember otm : oppTeamMembers){
			opportunityTeamMemberMap.get(otm.OpportunityId).add(otm);
		}
	}
}
Then in the Visualforce page we can put another page block table within one of the columns. This page block table iterates over the list Opportunity Team Members that we get from the map using the key that is the Opportunity Id. Within this table we can add whatever columns we choose.
<apex:column headervalue="Opportunity Team Members">
	<apex:pageblocktable value="{!opportunityTeamMemberMap[o.Id]}" var="otm">
		<apex:column value="{!otm.User.Name}" />
		<apex:column value="{!otm.TeamMemberRole}" />
		</apex:pageblocktable>
</apex:column>
Putting it all together:
public class OpportunityReportCont {
	public List allOpportunities {get;set;}
	public List displayOpportunities {get;set;}
	public Opportunity filterOpportunity {get;set;}
	public Map> opportunityTeamMemberMap {get;set;}

	public OpportunityReportCont () {
		allOpportunities = new List([SELECT Id, Name, Type, Amount, CloseDate, Description, ExpectedRevenue, ForecastCategoryName, LeadSource, NextStep, Probability, TotalOpportunityQuantity, StageName FROM Opportunity]);

		filterOpportunity = new Opportunity();

		displayOpportunities = new List(allOpportunities);

		opportunityTeamMemberMap = new Map>();
		for(Opportunity o : allOpportunities){
			opportunityTeamMemberMap.put(o.Id, new List());
		}
		List oppTeamMembers = new List([SELECT Id, OpportunityId, UserId, User.Name, TeamMemberRole FROM OpportunityTeamMember WHERE OpportunityId IN :opportunityTeamMemberMap.keyset()]);
		for(OpportunityTeamMember otm : oppTeamMembers){
			opportunityTeamMemberMap.get(otm.OpportunityId).add(otm);
		}
	}

	public void filter(){
	    displayOpportunities = new List();
		for(Opportunity o : allOpportunities){
			if (String.isEmpty(filterOpportunity.Type) || filterOpportunity.Type == o.Type){
				if (String.isEmpty(filterOpportunity.LeadSource) || filterOpportunity.LeadSource == o.LeadSource){
					displayOpportunities.add(o);
				}
			}
		}
	}

}
<apex:page controller="OpportunityReportCont" tabstyle="Opportunity">

    <apex:sectionheader title="Opportunity Report" subtitle="Opportunities" />
    <apex:form>

        <apex:pageblock title="Filter">
            <apex:pageblocksection>

                <apex:inputfield value="{!filterOpportunity.Type}">
                    <apex:actionsupport event="onchange" action="{!filter}" rerender="opportunityTable" />
                </apex:inputfield>

                <apex:inputfield value="{!filterOpportunity.LeadSource}">
                    <apex:actionsupport event="onchange" action="{!filter}" rerender="opportunityTable" />
                </apex:inputfield>

            </apex:pageblocksection>
        </apex:pageblock>

        <apex:pageblock title="Opportunities" id="opportunityTable">
            <apex:pageblocktable value="{!displayOpportunities}" var="o">

                <apex:column headervalue="Housing Application ID" style="width:30px">
                    <apex:outputlink value="/{!o.Id}" on-click="window.top.location.href='/{!o.Id}'; return false;">{!o.Name}</apex:outputlink>
                </apex:column>

                <apex:column value="{!o.Type}" />
                <apex:column value="{!o.Amount}" />
                <apex:column value="{!o.CloseDate}" />
                <apex:column value="{!o.ExpectedRevenue}" />
                <apex:column value="{!o.ForecastCategoryName}" />
                <apex:column value="{!o.LeadSource}" />
                <apex:column value="{!o.Probability}" />
                <apex:column value="{!o.StageName}" />

                <apex:column headervalue="Opportunity Team Members">
                    <apex:pageblocktable value="{!opportunityTeamMemberMap[o.Id]}" var="otm">
                        <apex:column value="{!otm.User.Name}" />
                        <apex:column value="{!otm.TeamMemberRole}" />
                    </apex:pageblocktable>
                </apex:column>

            </apex:pageblocktable>
        </apex:pageblock>
    </apex:form>
</apex:page>
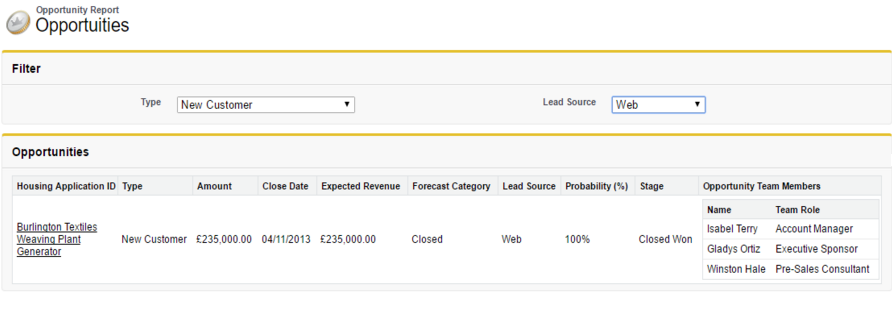
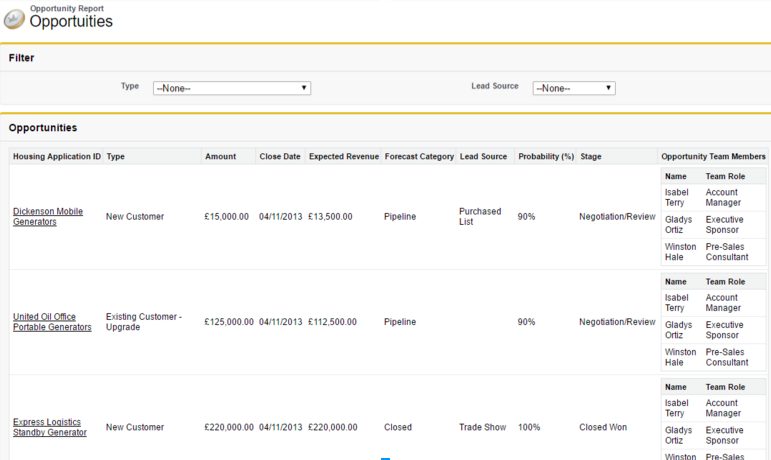
Here are the results:
In this example, the filters are used to filter on Customer Type, to only show New Customers and then to filter on where the Lead Source is Web.
In this example, no filters are used, and the entire set of Opportunities along with the Opportunity Team Members are displayed.
What Certification are you studying for now?
Focus on Force currently provides practice exams and study guides for sixteen certifications